Search This Blog

Showing posts with label telemetry. Show all posts

Saturday, 20 May 2023

Smart Port Telemetry, INAV and F4

FrSKY receivers with S-Port capability can send telemetry data back to the transmitter. The data can come from FrSKY S-Port telemetry sensors but also from flight control boards (FCBs).

SBUS and Smart Port are inverted signals, compared to normal convention for flight control boards and receivers. Flight control boards need to un-invert these inputs to be usable.

F7 boards have inverters on all UARTs which can be enabled in the configurator, so SBUS and SmartPort inputs can be connected to any UART.

F4 boards only have one UART inverter (for SBUS), usually on the Rx2 pin. But we need an inverted Tx pin for the Smart Port input.

So this is where Soft Serial comes in. Soft Serial creates a software defined UART which can be inverted.

By enabling Soft Serial or "CPU based serial ports" Tx2 becomes available as an inverted pin for Smart Port connection.

The steps below show how:

1. Enable "Enable CPU based serial ports" and "Telemetry output" in the INAV configuration page


2. Choose "SmartPort" in the Telemetry column for SOFTSERIAL1 in the Ports page


3. Choose SBUS, OFF, AUTO or OFF in the Receiver page


4. On the F4 board connect SBUS to the SBUS pin and SmartPort into the TX2 pin


5. "Discover new" sensors on your transmitter, and you should see all the extra FC telemetry appearing.


Tuesday, 3 March 2015

FrSKY Lipo voltage sensor

This sensor (cost about A$22) enables telemetry for the total battery voltage and individual cell voltages. Also called the FLVSS sensor.

It is small and lightweight and has a very clear OLED screen which means it can be used as a stand alone battery checker.

It plugs into the balance lead of the battery and connects to the X series receiver via the Smart Port.


This video covers connection and setup directly on the Taranis Plus transmitter. Spoken values and on-screen display of total voltage and the lowest individual cell voltage, with a little flight at the end.


FrSKY 40A current sensor

This sensor (cost about A$27) enables current, voltage and consumed mAh telemetry. This is one of the most useful modules for flying powered planes because it means you don't need to keep landing to check the battery level.

It plugs in-line between the battery and ESC and connects to the receiver via the Smart Port.

This video covers connection and setup using OpenTX companion, Taranis Plus transmitter and OpenTX 2.0. On-screen display and spoken voltage and mAh consumption values. Viewing of recorded logs in OpenTX companion.

Sunday, 1 March 2015

FrSKY GPS sensor

This is the FrSKY GPS sensor which enables position, altitude, speed and distance data on the Taranis. Cost about A$49.


The UP side must face upwards with a clear view of the sky, under foam may be OK.

Once connected it takes a few minutes for the sensor to acquire satellites. 
When it is ready the red led will change from fast to slow flashing and Lat and Long will appear on the telemetry screen 3.


This video covers connection and setup, how to enable spoken altitude, speed and distance values, telemetry logging and displaying flight tracks in Google Earth.


Saturday, 28 February 2015

FrSKY Variometer sensor

This is a barometric pressure sensor which provides telemetry for vertical speed changes and altitude. These values are very useful for RC glider pilots looking for thermal lift. Cost about A$33 (Feb 2015)


The telemetry can be presented in a few different ways.

1. As beeps of varying pitch to indicate whether the glider is rising or sinking. Higher pitch beeps for rising or lift and lower pitch beeps when it's sinking.

2. As spoken altitude values. My preferred method.

3. As on-screen numbers. Not so good because you have to look away from the glider to see the screen.

4. As an altitude graph in OpenTX companion on your computer. (If SD card logging is enabled on the Taranis)


This video explains how to connect and setup the vario with a Taranis Plus running OpenTX 2.0, and with OpenTX companion on an iMac.


Thursday, 26 February 2015

FrSKY Telemetry sensors

One of the most exciting functions of the Taranis X9D is telemetry. 
As well transmitting signals to the onboard receiver, the Taranis can receive data sent back from sensors on the plane. That data can be recorded on the SD card for later viewing, or presented live on the screen or even as spoken values and audio prompts.

In the next series of posts I will explain the functions of each sensor and how to get them working.

Here are four of the FrSKY telemetry sensors with the X8R receiver. 40A current sensor. LiPo voltage sensor. Variometer sensor. GPS sensor.

Each sensor is supplied with a female to female servo lead to connect it to the S-Port on the receiver. A second set of S-Port pins allows more than one sensor to be connected to the receiver at a time. You simply connect one sensor to the next in line.

Once correctly connected to a powered receiver the red LED on the sensor will change from fast flashing to slow flashing. That may take a few more minutes with the GPS.

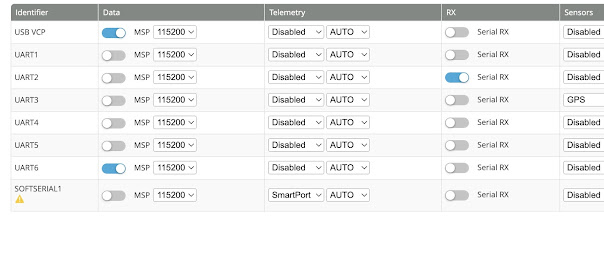
At this stage the sensor is transmitting telemetry data but you can't see it anywhere. You need to go to the Special Functions screen for the current model to activate telemetry recording and sounds, or the Telemetry setup page for on-screen displays.

Activating SD logs

In the Special Functions screen select a switch (e.g. SG-), select "SD Logs" from the list of available functions, select how often telemetry data points are recorded (e.g. every 1.0s) Now whenever the SG switch is in the middle position telemetry data is recording onto the SD card.
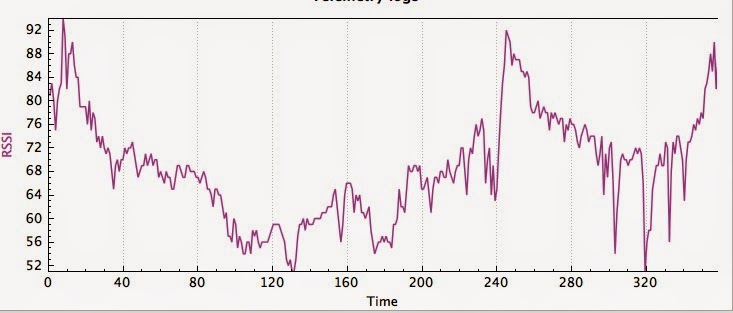
SD logs include all the available telemetry data. RSSI (signal strength) and the position of every stick, knob and switch on the Taranis are recorded without any sensors required. With the appropriate sensors connected data like speed, position, altitude, distance, current, power usage and voltage are recorded. It's a mass of fascinating information to look at after your flight using OpenTX companion. If you're in to graphs you will love SD logs. 

Here are a few examples of what is available via OpenTX companion on your PC. 
I will go into more detail with each sensor in following posts.

Signal strength

Flight battery voltage

Current draw 

Telemetry display screens

To view the data in real time you need to go to the Telemetry setup page for your current model, scroll down to Screen 1 and select the values to be displayed. You can choose Bars for bar graphs or Nums for numbers on the screen.

In this example I have selected RSSI, Current and Timer 1 to be displayed on Screen1 of the telemetry screens. The 40A current sensor would be required in this case.
Here's how it looks on the live telemetry screen. Of course numbers greater than zero would appear if the plane was powered up and flying.

Spoken telemetry

The most useful way to present live telemetry is via sound or voice. Dependng on which sensors are connected the lovely lady in my Taranis can tell me such things as the altitude of my glider or how many mAH have been consumed, no need to look at the screen at all. 

To activate audio telemetry go to Special Functions, select a switch, select PlayValue, select which value to play and select how often to repeat.

In this example the Taranis will tell me the Consumed Power (Cnsp) in mAH every 10 seconds when the SC switch is down. (As long as the 40A current sensor is connected)

This is only scratching the surface of what is possible with the Taranis and OpenTX. 

There are logical switches to play with and LUA scripting as well. LUA scripts are like little programs that you can run on your transmitter. They can add functions like the Model Setup Wizard or extra graphical telemetry screens. There are hundreds of scripts available for download on the OpenTX forums. The possibilities are endless.

Sunday, 15 February 2015

FrSKY X8R and X4R receiver connections

The latest receivers for the Taranis are the X series. They are  telemetry, S-Port and S-Bus capable.

I don't really understand S-Bus at this stage, it has something to do with connecting another receiver for more channels or many S-Bus servos into one plug.

However I do use the S-Port for connecting telemetry modules. On the X8R the S-Port is a servo style connector - easy. But on the X4R the S-Port is a different 4 pin socket. A 4 pin plug with 4 bare ended wires is supplied so you need to make up your own servo style plug.

This video shows what I'm talking about