Suddenly there are 10 planes vying for space in the hangar (hanging on the wall that is) so I thought it might be time to look back and review the fleet and my timeline of RC flight.
I have always been intrigued by foils. I have been mucking around with kites, sails and fins for as long as I can remember. Seeing what Ed from
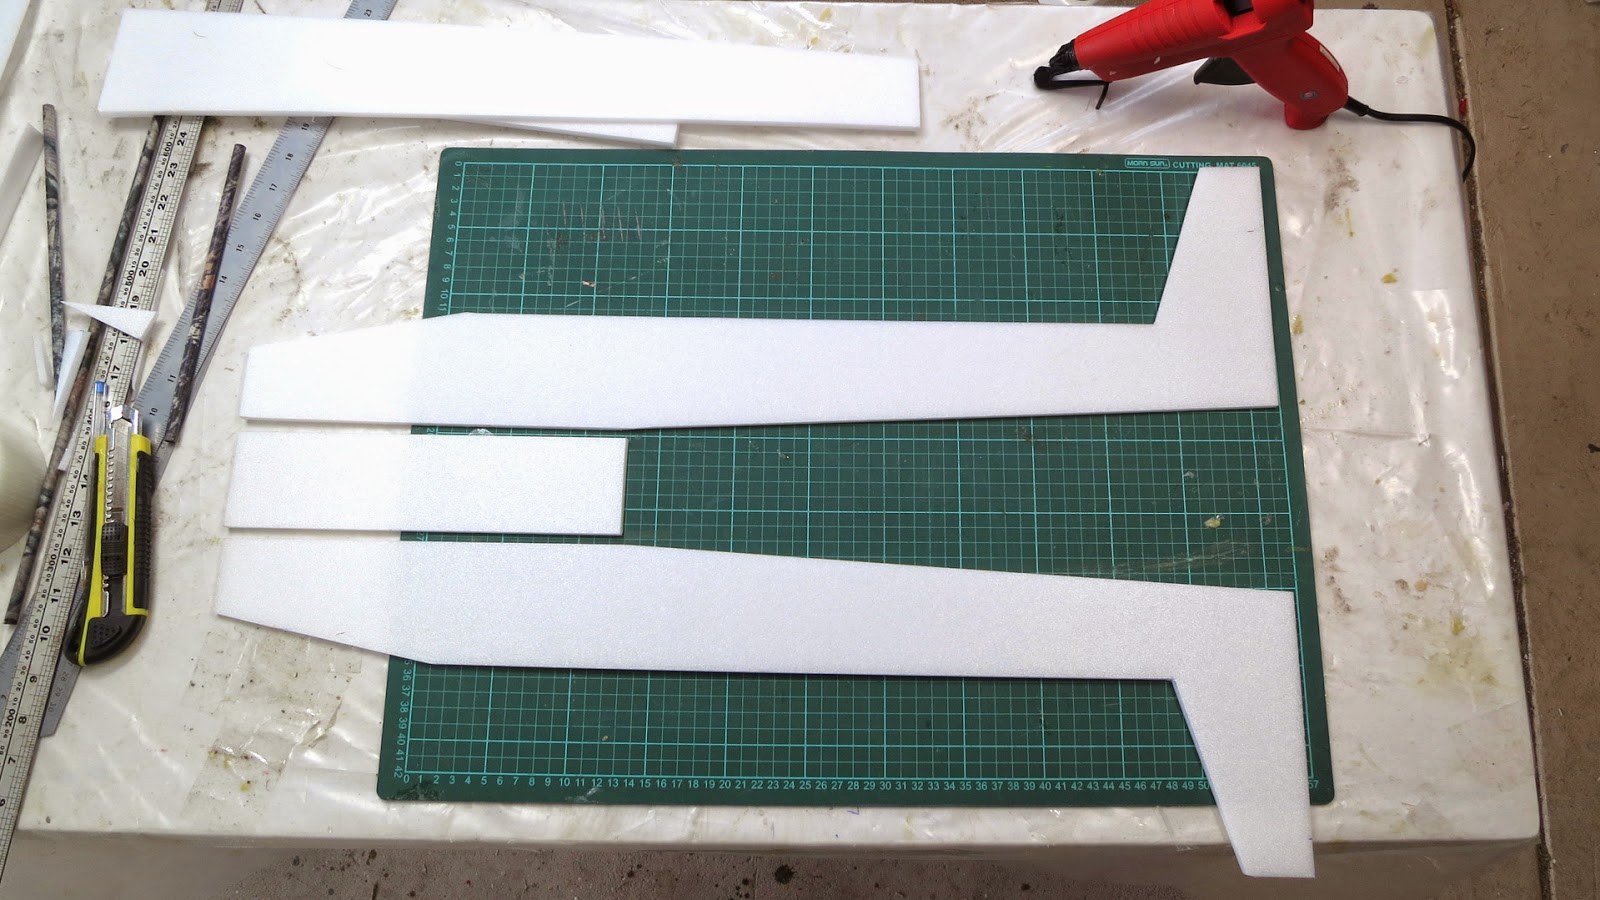
Experimental Airlines (EA) could produce with foam board, packing tape and hot glue was the inspiration that got me into this hobby so I started with one of his unique designs.
Ansley Peace Drone (APD)

1.5m (60") Quill foamboard wing
750mm (30") depron canard and fuselage
Elevons
This is the very first airframe I built before flying anything at all. It's a canard pusher plane which means the little wing is at the front and the motor is mounted at the rear. The only control surfaces are combined elevator and ailerons or elevons, requiring a programable transmitter.
The APD interested me because Ed designed it to carry a GoPro in the nose. I didn't complete this plane but it taught me the essential EA style building skills.
Photon motor glider

1.5m (60") Quill foamboard wing and fuselage
Depron tail
Ailerons, elevator, rudder
Turnigy 2826/6 2200kV motor with 6x4" prop
900g flying weight
2200mAh 3S battery
I thought I should learn to fly on a more conventional plane with elevator, rudder, ailerons and motor at the front so the APD main wing was reused as the Photon wing.
Timelapse Photon fuselage and tail build

This was the very first RC plane I flew, no experience at all, no friends who flew RC, not even simulator time. I had read a lot and watched videos, but in hindsight I was making my life difficult trying to build and learn to fly my first plane with no help and no experience. But lots of valuable lessons were learned very quickly.
On the maiden flight I did succeed in getting off the ground and flying around a little bit but nosed in after a few minutes - no idea why. On the second flight I launched, flew around (occasionally in control) and glided down for a soft landing when the motor stopped making a noise.
Lesson learned - balance the prop and Locktite the motor mounting screws in.
Photon second flight
Within a few flights I realised that this plane was not the best trainer for a complete beginner. I'd be flying OK then lose orientation, panic and crash, requiring another nose rebuild, so I decided to transform the Photon into another of Ed's designs, the more docile Axon trainer.
Axon pusher prop trainer

Reused wing and tail from Photon
Ailerons, elevator, rudder
Turnigy 2826/6 2200kV motor with 6x4" prop
950g flying weight
2200mAh 3S battery
The great feature of the Axon is that the motor and prop are behind the wing and the nose just holds the battery. As you can see in the maiden video a crunched nose doesn't mean the end of the flying session.
I also added some dihedral to the wing tips which means the plane is self levelling to some extent. The high wing and pusher prop setup make the Axon a much better trainer.
Axon trainer maiden
Success! This plane taught me to fly. No turning back now.
Mosquito

750mm (30") wingspan
400g flying weight
500mAh 2S battery
Ailerons, elevator
Hextronic 24g motor with 8x4" prop
Reusing the APD 30" canard wing section I made up this small and lightweight plane with an arrow shaft as the fuselage. 24g Hextronic motor, ailerons and elevator.
The mosquito was fun but a bit frantic. It was too manoeuvrable and nimble for my flying skills at that stage. I had lots of prop breaking crashes and found it very difficult to keep up in the air. A design to revisit in the future.
Old Fogey

The chaps at Flite Test (FT) designed this slow flying almost comical looking plane and, as with all their designs, provided plans online.
I set about making one from locally available Quill foam board, 24g motor and the same electronics as FT.
It just didn't want to fly, couldn't stay airborne for more than a few meters with the tiny 24g motor and 2S battery. With a more powerful 2826/6 2200kV motor it took off but was uncontrollable.
Turns out the Adams foam board used by FT is half the weight (and 1/10th the price) of Quill. Unfortunately Adams board (also called Dollar Tree foam board) is not available here.
Even drastic weight saving measures, like cutting holes everywhere, weren't enough to get the Old Fogey working well. Most of my problem was reluctance to weight up the nose enough for balance. I'm sure I can get the Old Fogey flying with the right combo of motor and weight balance but for now it is just a display plane. Another project to revisit when time permits. I'll make one from depron eventually and all will be good.
Foamboard in Australia
This triggered an exhaustive investigation into foam board in Australia. I found that all paper-covered board available here was way heavier than Adams and up to 10 times the price.
Here's my article on Flite Test
Uncovered 6mm Depron from
tradewarehouse.com.au turned out to be the best locally available building material. It's even lighter than Adams foam board and the one of the cheapest options when bought in bulk, working out at $5.30 per equivalent 70x50cm board. The bulk box contains 20 double sized 100cm x 70cm boards and costs $212 delivered.
Bixler 2 motor glider

1.5m wingspan
Ailerons, flaps, elevator, rudder
EPO foam construction
850g flying weight
2200mAh 3S battery
This was my first shop-bought plane and what a revelation it was. I'd advise anyone starting out to buy one of these and the learning experience will be much easier and quicker.
$80 from HobbyKing with motor and servos installed but you need to add ESC, battery and receiver (and flap servos if you want).
It comes with separate ailerons and flaps but no flap servos installed. I added them because I wanted to play with the full house of control surfaces. However the flaps are not necessary for normal flying, might be useful for carrying heavy loads but I think it's better to join the flaps and ailerons to make them almost full span, better for aerobatics.
The Bixler is perfect for carrying a camera and very popular as an FPV (First Person View) platform. Haven't tried FPV yet, another future project. It's a wonderful motor glider to fly, very smooth and stable, can hold up to many crashes, easy to repair and spare parts are very cheap.
Lessons learned - Tighten the prop retaining collet hard. Launching can be tricky, need to give it a decent throw with 3/4 revs and pull back on the elevator stick straight away. The high mounted and down angled pusher motor tends to drive the plane down in to the ground on launch.
Bixler 2 maiden flight -
Bixler tail cam
In those early weeks there didn't seem to be many calm windless days, which are essential for learning. There's the biggest tip for learning…wait for a calm day. Wind is your enemy when learning, it's so much easier when your plane isn't speeding off down wind with every mistake.
I decided to use the wind and investigate slope soaring. We have plenty of suitable slopes around Geelong and plenty of wind. The idea of not having to worry about motors, ESCs and props also appealed to me.
Yellow Depron Sloper
1.2m wingspan
130mm (5") chord + 30mm (1.25") flaperons
420g flying weight
500mAh 2S battery
Flaperons, elevator
This TLAR design plane (That Looks About Right) uses a 7.5mm carbon fibre arrow shaft from nose to tail. The 5" chord Armin wing has some dihedral built in which makes the glider easier to fly. To some extent it self corrects the side to side roll. 5mm CF spars fit into a bent aluminium tube to set the dihedral angle.
I was amazed the first time I threw it off a slope, it actually worked. Without really knowing what I was doing I could make it hover out in front. Eventually I learned to fly along the slope but in strong winds I often lost control to see it flying away over my head. However this plane did a lot to train my fingers on the sticks. A great little glider that is still flying today.
Lessons leaned - Slope soaring is great fun. Need to keep it out front in strong wind.
Yellow sloper maiden -
Yellow sloper onboard video
Synapse flying wing sloper

1.3m (48") wingspan (measured straight across)
Made from 2 x 700mm, 7" chord Armin sections
7" chord with 2" elevons (10" swept chord)
350g flying weight plus 50 to 150g ballast
4xAAA NiMH battery
Next in the line up was another EA design.
The Synapse was designed as a flying wing with a fuselage pod holding the motor and battery, but I wanted to try it as a pure wing sloper.
This one is so easy and quick to build, all done in a day. Flying wings are almost indestructible and even after many hard landings this one is still flying today.
This glider prompted me to investigate the many nearby coastal dunes and introduced me to proper slope soaring, what a buzz. Slope soaring is now, by a long way, my favourite form of RC flight.
Can't beat the feeling of climbing to the top of the dune, feeling the breeze straight in your face and seeing the wide expanse of deserted beach below.
Lessons learned - Coastal dune slope soaring is my favourite pastime. More weight is required as wind strength increases. Coastal dune scrub is almost impenetrable.
Synapse sloper maiden -
Synapse in 15kn
VERSUS Discus Launch Glider (DLG)

1.5m wingspan
300g flying weight
300mAh 2S battery
Flaperons, elevator, rudder
After watching the
DLG episode of Flite Test I had to have one. DLGs are ultralight and highly refined thermal gliders that you launch using a discus style spinning launch.
The VERSUS is probably the cheapest entry level DLG available, costing around $200 for the
kit from Hobby King. Four high quality micro servos, small receiver and battery are required so final cost is closer to $300. Competition level DLGs cost 2 to 3 times more but the VERSUS is fine for me.
Here is my
detailed video and photo log of the build.
I love flying this DLG although early hard landings have led to a few too many repair sessions. A bad launching technique can play havoc with dodgy shoulders, but I'm improving. Decent DLGers can launch to 60m while I'm currently only getting up to 40m.
If there are no thermals or lift around flights last for 30 or 40 sec. But when you find some rising air the thrills begin and flight times can extend to minutes. There are lots of new skills to learn with launching, thermal hunting and DLG catching so I'm sure I'll be DLGing for years to come. This my plane of choice for warm calm days.
Lessons learned - Don't drop the transmitter while doing the discus launch spin, use a wrist strap. Throw with your body not your just arm.
VERSUS DLG maiden -
First thermal -
Catch and throw
Le Fish aerobatic slope soarer

1.5m wingspan symmetrical airfoil
Laminate covered EPP foam
Flaperons, elevator, rudder
600g flying weight
500mAh 3S battery
The next slope soarer purchase was inspired by
Steve Lange and his Le Fish performing beautiful and mind blowing manoeuvres on the slope. In 2005 Steve designed this glider to perform unlimited VTPR aerobatics. (VTPR - French for Aerobatics close to the ground)
Le Fish is an EPP foam, laminate covered sloper that is designed to fly upside down, sideways, perform loops and rolls and whatever else the pilot is up for.
Here's my
build video and photo log for Le Fish. This kit came from
Leading Edge Gliders for US$140 plus about $50 freight.
The build taught me lots of new techniques, like foam fuselage shaping, laminate covering and deciding how to lay out the electrics. There are no set instructions and many different configurations.
Flying slope aerobatics takes a lot of practice and glider trimming but it's all worth it. The shape and height of your slope dictates what style of aerobatics is possible. A steep cliff is needed for true VTPR style flying, unlike our gentle low dunes.
Lessons learned - Aerobatics is not easy but great fun learning. You will crash often but these EPP gliders are very tough.
Le Fish maiden -
Getting better -
Le Carnage
Ultralight Le Fish

1.5m wingspan symmetrical airfoil
Laminate covered EPP foam
Flaperons, elevator, rudder
450g flying weight
500mAh 3S battery
That hard crash in "Le Carnage" prompted me to order 2 spare Le Fish
short kits from Flying Foam. I didn't think my first Le Fish would survive my aerobatics learning process.
Turns out I was wrong, it's still going well and not looking like falling apart any time soon.
With one of the kits I decided to build an ultralight Le Fish. Smaller lighter servos and less reinforcing spars save quite a lot of weight and make for a wonderful floaty sloper. It feels quite delicate but less weight means less momentum in the crashes, and I tend to only use this one in lighter winds.
The ULF acts like it's on an elastic sky hook, recovering instantly from stalls and mistakes, and is so responsive it's an absolute delight. At this stage I have only had a few sessions but can't wait for more.
Ultralight Le Fish maiden
Lesson learned - Lighter is better. Le Fish is awesome.
Bixler 2 as a slope soarer

As my sloping skills improved I was keen to try other planes on the dunes.
On one light wind day when the ULF was struggling to stay up I decided to give the Bixler a throw. What an eye opener, very smooth and stable flying in the light lift along the ridge and with the security of the motor for extra light patches.
As a pure sloper when the wind gets around 10kn it is wonderful, not aerobatic but a relaxing cruiser. I guess the flat bottomed wings produce more lift than the symmetrical Le Fish wings.
Bixler 2 sloping
Motorised Synapse wing

Turnigy 2826/6 2200kV motor with 6x4" prop
Hextronic 24g motor with 8x4" prop
550 to 600g flying weight
1300mAh 3S battery
The time had come to revisit old designs and see what some tweaks could achieve.
I decided to try a motor on the Synapse as Ed originally intended and the result was excellent. The Synapse, if the weight is kept light, makes a really nice slow and steady flyer.
With the extra weight of motor and battery it became a much smoother and more controllable slope soarer too.
Motorised Synapse -
Slope soaring
2m motor glider

2m wingspan
5" chord + 1.5" ailerons
750g flying weight
1300mAh 3S battery
Turnigy 2826/6 2200kV motor with 6x4 prop
I have been hearing so many glowing reviews of the 2m Radian motor glider so I thought I'd try to
make something similar.
Unfortunately this one never lived up to my hopes. It looked great and climbed eagerly into the sky but the glide slope was terrible and directional stability all over the place. It would loop up and down and wobble side to side excessively. Shifting the CG around didn't seem to help much. Taking out the dihedral did smooth it out a bit but didn't improve the glide slope to what I was expecting.
In the end I figured my airfoil shape was too fat. The wing was a 5" chord Armin style construction but I was using 6mm depron, not 5mm Adams foam board, and a 7.5mm spar. With 2 layers of former and the thicker spar mine ended up about 26mm thick compared to Ed's 20mm.
I eventually crunched this plane trying low level inverted flying. Might have been sub consciously deliberate? Anyway I was glad to move on and investigate thinner airfoils suitable for my 6mm depron.
Ansley Peace Drone - revisited

1.5m (60") wing
750mm (30") canard and fuselage
Elevons
Turnigy 2836 1700kV motor with 10x4 prop
950g flying weight
2200mAh 3S battery
I slit open the 2m motor glider wing, ripped out one layer of former then glued it back together.
Cut down to 1.5m it made the APD main wing with a slimmer 20mm thick 5" chord. One of the 25cm offcuts and the original APD canard made up the new 30" canard and the APD was reborn.
This is a real slow and steady cruiser with elevon control only. It's great in a straight line but to turn it needs sufficient speed and height. It looks plain weird in the sky seemingly flying backwards.
As a slope soarer it was not a great success. Motor is required to make the turns but it cruises along the ridge nicely.
Ansley Peace Drone -
APD sloping
Orange slim wing

1.2m wing
6.5" chord + 1.5" ailerons
20mm thick
Flaperons, elevator, rudder
Turnigy 2826/6 2200kV motor with 6x4 prop
600g flying weight
1300mAh battery
I made this plane to test the theory that a thinner airfoil is better than one that is too thick.
The slimmer wing works very well with a great glide slope and smooth controllable performance, none of the looping and stalling of the 2m wing. Mild aerobatics like loops and rolls were easy and it could fly inverted with heaps of elevator.
An electrical brown-out brought about the premature demise of this one, maybe due to my dodgy soldering. I have since upgraded to a more powerful soldering iron.
Orange slim wing maiden
Orange slim wing slope soarer

1.2m wing
6.5" chord + 1.5" ailerons
20mm thick
Flaperons, elevator, rudder
450g flying weight
500mAh 3S battery
I rebuilt this one as a sloper, which basically means replacing the crunched motor mount nose with a longer battery-holding nose.
Awesome, it worked very well, nimble, light and easy to fly. Rolls were OK but inverted required heaps of elevator. Loops weren't possible.
Orange slim wing sloper
Next project is to try this glider with a symmetrical wing and Le Fish sized elevator and rudder.