My much loved Versus DLG has been crashed and repaired many times and is looking a bit rough now. But it was a great intro to DLGs. Hobby King's big sale came along at just the right time. The updated Versus, now called the V2, dropped from A$450 to $280, couldn't resist that price.
The V2 has a disser construction wing, crossed CF ribbon reinforcing, and a kevlar pod but otherwise is identical to the Versus.
I bought the Plug N Fly version which is OK, but might have been wiser to get the ARF version and add my own servos.
Here are my detailed build videos showing strengthening and control mods.
After a few weeks the V2 is going well, feels like a better Versus. I wouldn't pay full price for it because there are many better alternatives available, but for the sale price it is excellent.
Showing posts with label - Versus DLG. Show all posts
Showing posts with label - Versus DLG. Show all posts
Sunday, 20 September 2015
Tuesday, 25 November 2014
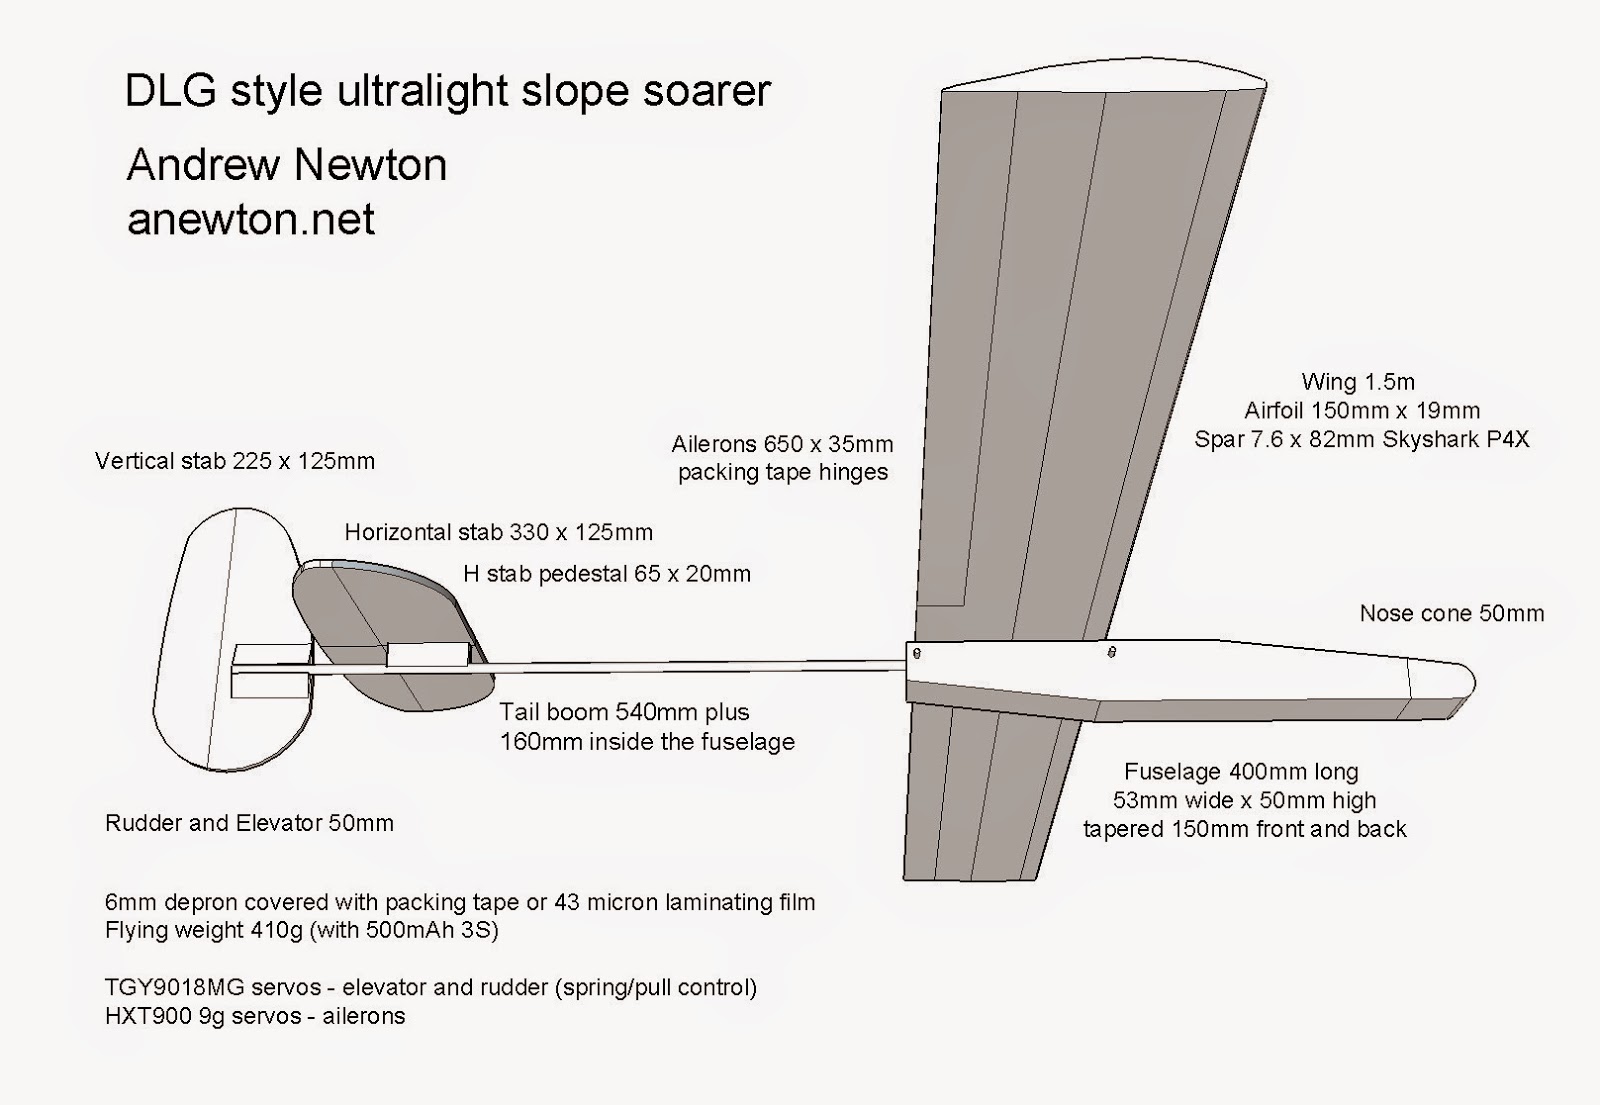
Ultra light slope soarer
The design for this lightweight aerobatic slope soarer was inspired by DLGs or discus launch gliders.
It will work in anything over 5kn on a decent slope and in 10kn it will work on any slope.
 The rudder and elevator are operated by a pull line acting against a torsion spring.
 This unique system means the servos can be forward in the fuselage and there are no pushrods going to the tail.
 The trick is to make a torsion spring strong enough to operate the control surface against the airflow
but not so strong as to overpower the servo.
The 0.4mm SS wire provided as pushrods for the Versus DLG turns out to be perfect.
It will work in anything over 5kn on a decent slope and in 10kn it will work on any slope.
The trick is to make a torsion spring strong enough to operate the control surface against the airflowbut not so strong as to overpower the servo.
The 0.4mm SS wire provided as pushrods for the Versus DLG turns out to be perfect.
SPECS
Wingspan - 1.5m (65") Armin wing
Length - 104cmm (38")
Flying weight (500mAh LiPo) - 410g
Ailerons
Elevator
Rudder
TGY 9018MG servos x 2 (elevator and rudder)
HXT900 servos x 2 (ailerons)
MATERIALS
6mm depron
43 micron laminating film
60 micron clear packing tape
2 x Skyshark P4X spars (7.6mm x 820mm)
- Wing spar 820mm
- Tail boom 700mm
150lb Kevlar kite line (pull line)
0.4mm SS wire (torsion springs)
Soft packing foam (nose cone)
4mm CF rod (wing tie down bars)
Overview and build video
Aerobatics in 10kn
Testing with dihedral and no ailerons
Skyshark P4X spars - http://www.kitesandfunthings.com/ProductInfo.aspx?productid=SSP4XCAM0
New Stuff iron-on film - EZload laminate - GBC Australia
Blank ID cards - Ebay http://www.ebay.com.au/usr/y2store?_trksid=p3984.m1439.l2754
UPDATE March 2015: On really hot days the rudder and elevator servos have moved out of position as the glue softened. I have added more foam packing and glue to fix them securely. The trailing edge of the wing has also popped open twice. I removed the ailerons, re-glued then taped the join, then reattached the ailerons. In the original build, by cutting out the ailerons from the wing, I removed too much of the glue holding that join.
Tuesday, 15 April 2014
Newton Airlines fleet - 6 months in
Suddenly there are 10 planes vying for space in the hangar (hanging on the wall that is) so I thought it might be time to look back and review the fleet and my timeline of RC flight.
I have always been intrigued by foils. I have been mucking around with kites, sails and fins for as long as I can remember. Seeing what Ed from Experimental Airlines (EA) could produce with foam board, packing tape and hot glue was the inspiration that got me into this hobby so I started with one of his unique designs.
Ansley Peace Drone (APD)

1.5m (60") Quill foamboard wing
750mm (30") depron canard and fuselage
Elevons
This is the very first airframe I built before flying anything at all. It's a canard pusher plane which means the little wing is at the front and the motor is mounted at the rear. The only control surfaces are combined elevator and ailerons or elevons, requiring a programable transmitter.
The APD interested me because Ed designed it to carry a GoPro in the nose. I didn't complete this plane but it taught me the essential EA style building skills.
Photon motor glider

1.5m (60") Quill foamboard wing and fuselage
Depron tail
Ailerons, elevator, rudder
Turnigy 2826/6 2200kV motor with 6x4" prop
I thought I should learn to fly on a more conventional plane with elevator, rudder, ailerons and motor at the front so the APD main wing was reused as the Photon wing.
Timelapse Photon fuselage and tail build
 This was the very first RC plane I flew, no experience at all, no friends who flew RC, not even simulator time. I had read a lot and watched videos, but in hindsight I was making my life difficult trying to build and learn to fly my first plane with no help and no experience. But lots of valuable lessons were learned very quickly.
On the maiden flight I did succeed in getting off the ground and flying around a little bit but nosed in after a few minutes - no idea why. On the second flight I launched, flew around (occasionally in control) and glided down for a soft landing when the motor stopped making a noise.
Lesson learned - balance the prop and Locktite the motor mounting screws in.
Photon second flight
Within a few flights I realised that this plane was not the best trainer for a complete beginner. I'd be flying OK then lose orientation, panic and crash, requiring another nose rebuild, so I decided to transform the Photon into another of Ed's designs, the more docile Axon trainer.
Axon pusher prop trainer

Reused wing and tail from Photon
Ailerons, elevator, rudder
Turnigy 2826/6 2200kV motor with 6x4" prop
950g flying weight
2200mAh 3S battery
The great feature of the Axon is that the motor and prop are behind the wing and the nose just holds the battery. As you can see in the maiden video a crunched nose doesn't mean the end of the flying session.
I also added some dihedral to the wing tips which means the plane is self levelling to some extent. The high wing and pusher prop setup make the Axon a much better trainer.
Axon trainer maiden
Success! This plane taught me to fly. No turning back now.
Mosquito

750mm (30") wingspan
400g flying weight
500mAh 2S battery
Ailerons, elevator
Hextronic 24g motor with 8x4" prop
Reusing the APD 30" canard wing section I made up this small and lightweight plane with an arrow shaft as the fuselage. 24g Hextronic motor, ailerons and elevator.
The mosquito was fun but a bit frantic. It was too manoeuvrable and nimble for my flying skills at that stage. I had lots of prop breaking crashes and found it very difficult to keep up in the air. A design to revisit in the future.
Old Fogey
 The chaps at Flite Test (FT) designed this slow flying almost comical looking plane and, as with all their designs, provided plans online.
I set about making one from locally available Quill foam board, 24g motor and the same electronics as FT.
It just didn't want to fly, couldn't stay airborne for more than a few meters with the tiny 24g motor and 2S battery. With a more powerful 2826/6 2200kV motor it took off but was uncontrollable.
Turns out the Adams foam board used by FT is half the weight (and 1/10th the price) of Quill. Unfortunately Adams board (also called Dollar Tree foam board) is not available here.
Even drastic weight saving measures, like cutting holes everywhere, weren't enough to get the Old Fogey working well. Most of my problem was reluctance to weight up the nose enough for balance. I'm sure I can get the Old Fogey flying with the right combo of motor and weight balance but for now it is just a display plane. Another project to revisit when time permits. I'll make one from depron eventually and all will be good.
Foamboard in Australia
This triggered an exhaustive investigation into foam board in Australia. I found that all paper-covered board available here was way heavier than Adams and up to 10 times the price. Here's my article on Flite Test
Uncovered 6mm Depron from tradewarehouse.com.au turned out to be the best locally available building material. It's even lighter than Adams foam board and the one of the cheapest options when bought in bulk, working out at $5.30 per equivalent 70x50cm board. The bulk box contains 20 double sized 100cm x 70cm boards and costs $212 delivered.
Bixler 2 motor glider
 1.5m wingspan
Ailerons, flaps, elevator, rudder
EPO foam construction
850g flying weight
2200mAh 3S battery
This was my first shop-bought plane and what a revelation it was. I'd advise anyone starting out to buy one of these and the learning experience will be much easier and quicker.
$80 from HobbyKing with motor and servos installed but you need to add ESC, battery and receiver (and flap servos if you want).
It comes with separate ailerons and flaps but no flap servos installed. I added them because I wanted to play with the full house of control surfaces. However the flaps are not necessary for normal flying, might be useful for carrying heavy loads but I think it's better to join the flaps and ailerons to make them almost full span, better for aerobatics.
The Bixler is perfect for carrying a camera and very popular as an FPV (First Person View) platform. Haven't tried FPV yet, another future project. It's a wonderful motor glider to fly, very smooth and stable, can hold up to many crashes, easy to repair and spare parts are very cheap.
Lessons learned - Tighten the prop retaining collet hard. Launching can be tricky, need to give it a decent throw with 3/4 revs and pull back on the elevator stick straight away. The high mounted and down angled pusher motor tends to drive the plane down in to the ground on launch.
Bixler 2 maiden flight - Bixler tail cam
In those early weeks there didn't seem to be many calm windless days, which are essential for learning. There's the biggest tip for learning…wait for a calm day. Wind is your enemy when learning, it's so much easier when your plane isn't speeding off down wind with every mistake.
I decided to use the wind and investigate slope soaring. We have plenty of suitable slopes around Geelong and plenty of wind. The idea of not having to worry about motors, ESCs and props also appealed to me.
Yellow Depron Sloper
 1.2m wingspan
130mm (5") chord + 30mm (1.25") flaperons
420g flying weight
500mAh 2S battery
Flaperons, elevator
This TLAR design plane (That Looks About Right) uses a 7.5mm carbon fibre arrow shaft from nose to tail. The 5" chord Armin wing has some dihedral built in which makes the glider easier to fly. To some extent it self corrects the side to side roll. 5mm CF spars fit into a bent aluminium tube to set the dihedral angle.
I was amazed the first time I threw it off a slope, it actually worked. Without really knowing what I was doing I could make it hover out in front. Eventually I learned to fly along the slope but in strong winds I often lost control to see it flying away over my head. However this plane did a lot to train my fingers on the sticks. A great little glider that is still flying today.
Lessons leaned - Slope soaring is great fun. Need to keep it out front in strong wind.
Yellow sloper maiden - Yellow sloper onboard video
Synapse flying wing sloper

1.3m (48") wingspan (measured straight across)
Made from 2 x 700mm, 7" chord Armin sections
7" chord with 2" elevons (10" swept chord)
350g flying weight plus 50 to 150g ballast
4xAAA NiMH battery
Next in the line up was another EA design.
The Synapse was designed as a flying wing with a fuselage pod holding the motor and battery, but I wanted to try it as a pure wing sloper.
This one is so easy and quick to build, all done in a day. Flying wings are almost indestructible and even after many hard landings this one is still flying today.
This glider prompted me to investigate the many nearby coastal dunes and introduced me to proper slope soaring, what a buzz. Slope soaring is now, by a long way, my favourite form of RC flight.
Can't beat the feeling of climbing to the top of the dune, feeling the breeze straight in your face and seeing the wide expanse of deserted beach below.
Lessons learned - Coastal dune slope soaring is my favourite pastime. More weight is required as wind strength increases. Coastal dune scrub is almost impenetrable.
Synapse sloper maiden - Synapse in 15kn
VERSUS Discus Launch Glider (DLG)
 1.5m wingspan
300g flying weight
300mAh 2S battery
Flaperons, elevator, rudder
After watching the DLG episode of Flite Test I had to have one. DLGs are ultralight and highly refined thermal gliders that you launch using a discus style spinning launch.
The VERSUS is probably the cheapest entry level DLG available, costing around $200 for the kit from Hobby King. Four high quality micro servos, small receiver and battery are required so final cost is closer to $300. Competition level DLGs cost 2 to 3 times more but the VERSUS is fine for me.
Here is my detailed video and photo log of the build.
I love flying this DLG although early hard landings have led to a few too many repair sessions. A bad launching technique can play havoc with dodgy shoulders, but I'm improving. Decent DLGers can launch to 60m while I'm currently only getting up to 40m.
If there are no thermals or lift around flights last for 30 or 40 sec. But when you find some rising air the thrills begin and flight times can extend to minutes. There are lots of new skills to learn with launching, thermal hunting and DLG catching so I'm sure I'll be DLGing for years to come. This my plane of choice for warm calm days.
Lessons learned - Don't drop the transmitter while doing the discus launch spin, use a wrist strap. Throw with your body not your just arm.
VERSUS DLG maiden - First thermal - Catch and throw
Le Fish aerobatic slope soarer
 1.5m wingspan symmetrical airfoil
Laminate covered EPP foam
Flaperons, elevator, rudder
600g flying weight
500mAh 3S battery
The next slope soarer purchase was inspired by Steve Lange and his Le Fish performing beautiful and mind blowing manoeuvres on the slope. In 2005 Steve designed this glider to perform unlimited VTPR aerobatics. (VTPR - French for Aerobatics close to the ground)
Le Fish is an EPP foam, laminate covered sloper that is designed to fly upside down, sideways, perform loops and rolls and whatever else the pilot is up for.
Here's my build video and photo log for Le Fish. This kit came from Leading Edge Gliders for US$140 plus about $50 freight.
The build taught me lots of new techniques, like foam fuselage shaping, laminate covering and deciding how to lay out the electrics. There are no set instructions and many different configurations.
Flying slope aerobatics takes a lot of practice and glider trimming but it's all worth it. The shape and height of your slope dictates what style of aerobatics is possible. A steep cliff is needed for true VTPR style flying, unlike our gentle low dunes.
Lessons learned - Aerobatics is not easy but great fun learning. You will crash often but these EPP gliders are very tough.
Le Fish maiden - Getting better - Le Carnage
Ultralight Le Fish
 1.5m wingspan symmetrical airfoil
Laminate covered EPP foam
Flaperons, elevator, rudder
450g flying weight
500mAh 3S battery
That hard crash in "Le Carnage" prompted me to order 2 spare Le Fish short kits from Flying Foam. I didn't think my first Le Fish would survive my aerobatics learning process.
Turns out I was wrong, it's still going well and not looking like falling apart any time soon.
With one of the kits I decided to build an ultralight Le Fish. Smaller lighter servos and less reinforcing spars save quite a lot of weight and make for a wonderful floaty sloper. It feels quite delicate but less weight means less momentum in the crashes, and I tend to only use this one in lighter winds.
The ULF acts like it's on an elastic sky hook, recovering instantly from stalls and mistakes, and is so responsive it's an absolute delight. At this stage I have only had a few sessions but can't wait for more.
Ultralight Le Fish maiden
Lesson learned - Lighter is better. Le Fish is awesome.
Bixler 2 as a slope soarer

As my sloping skills improved I was keen to try other planes on the dunes.
On one light wind day when the ULF was struggling to stay up I decided to give the Bixler a throw. What an eye opener, very smooth and stable flying in the light lift along the ridge and with the security of the motor for extra light patches.
As a pure sloper when the wind gets around 10kn it is wonderful, not aerobatic but a relaxing cruiser. I guess the flat bottomed wings produce more lift than the symmetrical Le Fish wings.
Bixler 2 sloping
Motorised Synapse wing
 Turnigy 2826/6 2200kV motor with 6x4" prop
Hextronic 24g motor with 8x4" prop
550 to 600g flying weight
1300mAh 3S battery
The time had come to revisit old designs and see what some tweaks could achieve.
I decided to try a motor on the Synapse as Ed originally intended and the result was excellent. The Synapse, if the weight is kept light, makes a really nice slow and steady flyer.
With the extra weight of motor and battery it became a much smoother and more controllable slope soarer too.
Motorised Synapse - Slope soaring
2m motor glider
 2m wingspan
5" chord + 1.5" ailerons
750g flying weight
1300mAh 3S battery
Turnigy 2826/6 2200kV motor with 6x4 prop
I have been hearing so many glowing reviews of the 2m Radian motor glider so I thought I'd try to
make something similar.
Unfortunately this one never lived up to my hopes. It looked great and climbed eagerly into the sky but the glide slope was terrible and directional stability all over the place. It would loop up and down and wobble side to side excessively. Shifting the CG around didn't seem to help much. Taking out the dihedral did smooth it out a bit but didn't improve the glide slope to what I was expecting.
In the end I figured my airfoil shape was too fat. The wing was a 5" chord Armin style construction but I was using 6mm depron, not 5mm Adams foam board, and a 7.5mm spar. With 2 layers of former and the thicker spar mine ended up about 26mm thick compared to Ed's 20mm.
I eventually crunched this plane trying low level inverted flying. Might have been sub consciously deliberate? Anyway I was glad to move on and investigate thinner airfoils suitable for my 6mm depron.
Ansley Peace Drone - revisited

1.5m (60") wing
750mm (30") canard and fuselage
Elevons
Turnigy 2836 1700kV motor with 10x4 prop
950g flying weight
2200mAh 3S battery
I slit open the 2m motor glider wing, ripped out one layer of former then glued it back together.
Cut down to 1.5m it made the APD main wing with a slimmer 20mm thick 5" chord. One of the 25cm offcuts and the original APD canard made up the new 30" canard and the APD was reborn.
This is a real slow and steady cruiser with elevon control only. It's great in a straight line but to turn it needs sufficient speed and height. It looks plain weird in the sky seemingly flying backwards.
As a slope soarer it was not a great success. Motor is required to make the turns but it cruises along the ridge nicely.
Ansley Peace Drone - APD sloping
Orange slim wing
 1.2m wing
6.5" chord + 1.5" ailerons
20mm thick
Flaperons, elevator, rudder
Turnigy 2826/6 2200kV motor with 6x4 prop
600g flying weight
1300mAh battery
I made this plane to test the theory that a thinner airfoil is better than one that is too thick.
The slimmer wing works very well with a great glide slope and smooth controllable performance, none of the looping and stalling of the 2m wing. Mild aerobatics like loops and rolls were easy and it could fly inverted with heaps of elevator.
An electrical brown-out brought about the premature demise of this one, maybe due to my dodgy soldering. I have since upgraded to a more powerful soldering iron.
Orange slim wing maiden
Orange slim wing slope soarer
 1.2m wing
6.5" chord + 1.5" ailerons
20mm thick
Flaperons, elevator, rudder
450g flying weight
500mAh 3S battery
I rebuilt this one as a sloper, which basically means replacing the crunched motor mount nose with a longer battery-holding nose.
Awesome, it worked very well, nimble, light and easy to fly. Rolls were OK but inverted required heaps of elevator. Loops weren't possible.
Orange slim wing sloper
Next project is to try this glider with a symmetrical wing and Le Fish sized elevator and rudder.
I have always been intrigued by foils. I have been mucking around with kites, sails and fins for as long as I can remember. Seeing what Ed from Experimental Airlines (EA) could produce with foam board, packing tape and hot glue was the inspiration that got me into this hobby so I started with one of his unique designs.
Ansley Peace Drone (APD)
1.5m (60") Quill foamboard wing
750mm (30") depron canard and fuselage
Elevons
This is the very first airframe I built before flying anything at all. It's a canard pusher plane which means the little wing is at the front and the motor is mounted at the rear. The only control surfaces are combined elevator and ailerons or elevons, requiring a programable transmitter.
The APD interested me because Ed designed it to carry a GoPro in the nose. I didn't complete this plane but it taught me the essential EA style building skills.
Photon motor glider
1.5m (60") Quill foamboard wing and fuselage
Depron tail
Ailerons, elevator, rudder
Turnigy 2826/6 2200kV motor with 6x4" prop
900g flying weight
2200mAh 3S batteryI thought I should learn to fly on a more conventional plane with elevator, rudder, ailerons and motor at the front so the APD main wing was reused as the Photon wing.
Timelapse Photon fuselage and tail build
This was the very first RC plane I flew, no experience at all, no friends who flew RC, not even simulator time. I had read a lot and watched videos, but in hindsight I was making my life difficult trying to build and learn to fly my first plane with no help and no experience. But lots of valuable lessons were learned very quickly.On the maiden flight I did succeed in getting off the ground and flying around a little bit but nosed in after a few minutes - no idea why. On the second flight I launched, flew around (occasionally in control) and glided down for a soft landing when the motor stopped making a noise.
Lesson learned - balance the prop and Locktite the motor mounting screws in.
Photon second flight
Within a few flights I realised that this plane was not the best trainer for a complete beginner. I'd be flying OK then lose orientation, panic and crash, requiring another nose rebuild, so I decided to transform the Photon into another of Ed's designs, the more docile Axon trainer.
Axon pusher prop trainer
Reused wing and tail from Photon
Ailerons, elevator, rudder
Turnigy 2826/6 2200kV motor with 6x4" prop
950g flying weight
2200mAh 3S battery
The great feature of the Axon is that the motor and prop are behind the wing and the nose just holds the battery. As you can see in the maiden video a crunched nose doesn't mean the end of the flying session.
I also added some dihedral to the wing tips which means the plane is self levelling to some extent. The high wing and pusher prop setup make the Axon a much better trainer.
Axon trainer maiden
Success! This plane taught me to fly. No turning back now.
Mosquito
750mm (30") wingspan
400g flying weight
500mAh 2S battery
Ailerons, elevator
Hextronic 24g motor with 8x4" prop
Reusing the APD 30" canard wing section I made up this small and lightweight plane with an arrow shaft as the fuselage. 24g Hextronic motor, ailerons and elevator.
The mosquito was fun but a bit frantic. It was too manoeuvrable and nimble for my flying skills at that stage. I had lots of prop breaking crashes and found it very difficult to keep up in the air. A design to revisit in the future.
Old Fogey
The chaps at Flite Test (FT) designed this slow flying almost comical looking plane and, as with all their designs, provided plans online.I set about making one from locally available Quill foam board, 24g motor and the same electronics as FT.
It just didn't want to fly, couldn't stay airborne for more than a few meters with the tiny 24g motor and 2S battery. With a more powerful 2826/6 2200kV motor it took off but was uncontrollable.
Turns out the Adams foam board used by FT is half the weight (and 1/10th the price) of Quill. Unfortunately Adams board (also called Dollar Tree foam board) is not available here.
Even drastic weight saving measures, like cutting holes everywhere, weren't enough to get the Old Fogey working well. Most of my problem was reluctance to weight up the nose enough for balance. I'm sure I can get the Old Fogey flying with the right combo of motor and weight balance but for now it is just a display plane. Another project to revisit when time permits. I'll make one from depron eventually and all will be good.
Foamboard in Australia
This triggered an exhaustive investigation into foam board in Australia. I found that all paper-covered board available here was way heavier than Adams and up to 10 times the price. Here's my article on Flite Test
Uncovered 6mm Depron from tradewarehouse.com.au turned out to be the best locally available building material. It's even lighter than Adams foam board and the one of the cheapest options when bought in bulk, working out at $5.30 per equivalent 70x50cm board. The bulk box contains 20 double sized 100cm x 70cm boards and costs $212 delivered.
Bixler 2 motor glider
1.5m wingspanAilerons, flaps, elevator, rudder
EPO foam construction
850g flying weight
2200mAh 3S battery
This was my first shop-bought plane and what a revelation it was. I'd advise anyone starting out to buy one of these and the learning experience will be much easier and quicker.
$80 from HobbyKing with motor and servos installed but you need to add ESC, battery and receiver (and flap servos if you want).
It comes with separate ailerons and flaps but no flap servos installed. I added them because I wanted to play with the full house of control surfaces. However the flaps are not necessary for normal flying, might be useful for carrying heavy loads but I think it's better to join the flaps and ailerons to make them almost full span, better for aerobatics.
The Bixler is perfect for carrying a camera and very popular as an FPV (First Person View) platform. Haven't tried FPV yet, another future project. It's a wonderful motor glider to fly, very smooth and stable, can hold up to many crashes, easy to repair and spare parts are very cheap.
Lessons learned - Tighten the prop retaining collet hard. Launching can be tricky, need to give it a decent throw with 3/4 revs and pull back on the elevator stick straight away. The high mounted and down angled pusher motor tends to drive the plane down in to the ground on launch.
Bixler 2 maiden flight - Bixler tail cam
In those early weeks there didn't seem to be many calm windless days, which are essential for learning. There's the biggest tip for learning…wait for a calm day. Wind is your enemy when learning, it's so much easier when your plane isn't speeding off down wind with every mistake.
I decided to use the wind and investigate slope soaring. We have plenty of suitable slopes around Geelong and plenty of wind. The idea of not having to worry about motors, ESCs and props also appealed to me.
Yellow Depron Sloper
130mm (5") chord + 30mm (1.25") flaperons
420g flying weight
500mAh 2S battery
Flaperons, elevator
This TLAR design plane (That Looks About Right) uses a 7.5mm carbon fibre arrow shaft from nose to tail. The 5" chord Armin wing has some dihedral built in which makes the glider easier to fly. To some extent it self corrects the side to side roll. 5mm CF spars fit into a bent aluminium tube to set the dihedral angle.
I was amazed the first time I threw it off a slope, it actually worked. Without really knowing what I was doing I could make it hover out in front. Eventually I learned to fly along the slope but in strong winds I often lost control to see it flying away over my head. However this plane did a lot to train my fingers on the sticks. A great little glider that is still flying today.
Lessons leaned - Slope soaring is great fun. Need to keep it out front in strong wind.
Yellow sloper maiden - Yellow sloper onboard video
Synapse flying wing sloper
1.3m (48") wingspan (measured straight across)
Made from 2 x 700mm, 7" chord Armin sections
7" chord with 2" elevons (10" swept chord)
350g flying weight plus 50 to 150g ballast
4xAAA NiMH battery
Next in the line up was another EA design.
The Synapse was designed as a flying wing with a fuselage pod holding the motor and battery, but I wanted to try it as a pure wing sloper.
This one is so easy and quick to build, all done in a day. Flying wings are almost indestructible and even after many hard landings this one is still flying today.
This glider prompted me to investigate the many nearby coastal dunes and introduced me to proper slope soaring, what a buzz. Slope soaring is now, by a long way, my favourite form of RC flight.
Can't beat the feeling of climbing to the top of the dune, feeling the breeze straight in your face and seeing the wide expanse of deserted beach below.
Lessons learned - Coastal dune slope soaring is my favourite pastime. More weight is required as wind strength increases. Coastal dune scrub is almost impenetrable.
Synapse sloper maiden - Synapse in 15kn
VERSUS Discus Launch Glider (DLG)
1.5m wingspan300g flying weight
300mAh 2S battery
Flaperons, elevator, rudder
After watching the DLG episode of Flite Test I had to have one. DLGs are ultralight and highly refined thermal gliders that you launch using a discus style spinning launch.
The VERSUS is probably the cheapest entry level DLG available, costing around $200 for the kit from Hobby King. Four high quality micro servos, small receiver and battery are required so final cost is closer to $300. Competition level DLGs cost 2 to 3 times more but the VERSUS is fine for me.
Here is my detailed video and photo log of the build.
I love flying this DLG although early hard landings have led to a few too many repair sessions. A bad launching technique can play havoc with dodgy shoulders, but I'm improving. Decent DLGers can launch to 60m while I'm currently only getting up to 40m.
If there are no thermals or lift around flights last for 30 or 40 sec. But when you find some rising air the thrills begin and flight times can extend to minutes. There are lots of new skills to learn with launching, thermal hunting and DLG catching so I'm sure I'll be DLGing for years to come. This my plane of choice for warm calm days.
Lessons learned - Don't drop the transmitter while doing the discus launch spin, use a wrist strap. Throw with your body not your just arm.
VERSUS DLG maiden - First thermal - Catch and throw
Le Fish aerobatic slope soarer
1.5m wingspan symmetrical airfoilLaminate covered EPP foam
Flaperons, elevator, rudder
600g flying weight
500mAh 3S battery
The next slope soarer purchase was inspired by Steve Lange and his Le Fish performing beautiful and mind blowing manoeuvres on the slope. In 2005 Steve designed this glider to perform unlimited VTPR aerobatics. (VTPR - French for Aerobatics close to the ground)
Le Fish is an EPP foam, laminate covered sloper that is designed to fly upside down, sideways, perform loops and rolls and whatever else the pilot is up for.
Here's my build video and photo log for Le Fish. This kit came from Leading Edge Gliders for US$140 plus about $50 freight.
The build taught me lots of new techniques, like foam fuselage shaping, laminate covering and deciding how to lay out the electrics. There are no set instructions and many different configurations.
Flying slope aerobatics takes a lot of practice and glider trimming but it's all worth it. The shape and height of your slope dictates what style of aerobatics is possible. A steep cliff is needed for true VTPR style flying, unlike our gentle low dunes.
Lessons learned - Aerobatics is not easy but great fun learning. You will crash often but these EPP gliders are very tough.
Le Fish maiden - Getting better - Le Carnage
Ultralight Le Fish
1.5m wingspan symmetrical airfoilLaminate covered EPP foam
Flaperons, elevator, rudder
450g flying weight
500mAh 3S battery
That hard crash in "Le Carnage" prompted me to order 2 spare Le Fish short kits from Flying Foam. I didn't think my first Le Fish would survive my aerobatics learning process.
Turns out I was wrong, it's still going well and not looking like falling apart any time soon.
With one of the kits I decided to build an ultralight Le Fish. Smaller lighter servos and less reinforcing spars save quite a lot of weight and make for a wonderful floaty sloper. It feels quite delicate but less weight means less momentum in the crashes, and I tend to only use this one in lighter winds.
The ULF acts like it's on an elastic sky hook, recovering instantly from stalls and mistakes, and is so responsive it's an absolute delight. At this stage I have only had a few sessions but can't wait for more.
Ultralight Le Fish maiden
Lesson learned - Lighter is better. Le Fish is awesome.
Bixler 2 as a slope soarer
As my sloping skills improved I was keen to try other planes on the dunes.
On one light wind day when the ULF was struggling to stay up I decided to give the Bixler a throw. What an eye opener, very smooth and stable flying in the light lift along the ridge and with the security of the motor for extra light patches.
As a pure sloper when the wind gets around 10kn it is wonderful, not aerobatic but a relaxing cruiser. I guess the flat bottomed wings produce more lift than the symmetrical Le Fish wings.
Bixler 2 sloping
Motorised Synapse wing
Turnigy 2826/6 2200kV motor with 6x4" propHextronic 24g motor with 8x4" prop
550 to 600g flying weight
1300mAh 3S battery
The time had come to revisit old designs and see what some tweaks could achieve.
I decided to try a motor on the Synapse as Ed originally intended and the result was excellent. The Synapse, if the weight is kept light, makes a really nice slow and steady flyer.
With the extra weight of motor and battery it became a much smoother and more controllable slope soarer too.
Motorised Synapse - Slope soaring
2m motor glider
2m wingspan5" chord + 1.5" ailerons
750g flying weight
1300mAh 3S battery
Turnigy 2826/6 2200kV motor with 6x4 prop
I have been hearing so many glowing reviews of the 2m Radian motor glider so I thought I'd try to
make something similar.
Unfortunately this one never lived up to my hopes. It looked great and climbed eagerly into the sky but the glide slope was terrible and directional stability all over the place. It would loop up and down and wobble side to side excessively. Shifting the CG around didn't seem to help much. Taking out the dihedral did smooth it out a bit but didn't improve the glide slope to what I was expecting.
In the end I figured my airfoil shape was too fat. The wing was a 5" chord Armin style construction but I was using 6mm depron, not 5mm Adams foam board, and a 7.5mm spar. With 2 layers of former and the thicker spar mine ended up about 26mm thick compared to Ed's 20mm.
I eventually crunched this plane trying low level inverted flying. Might have been sub consciously deliberate? Anyway I was glad to move on and investigate thinner airfoils suitable for my 6mm depron.
Ansley Peace Drone - revisited
1.5m (60") wing
750mm (30") canard and fuselage
Elevons
Turnigy 2836 1700kV motor with 10x4 prop
950g flying weight
2200mAh 3S battery
I slit open the 2m motor glider wing, ripped out one layer of former then glued it back together.
Cut down to 1.5m it made the APD main wing with a slimmer 20mm thick 5" chord. One of the 25cm offcuts and the original APD canard made up the new 30" canard and the APD was reborn.
This is a real slow and steady cruiser with elevon control only. It's great in a straight line but to turn it needs sufficient speed and height. It looks plain weird in the sky seemingly flying backwards.
As a slope soarer it was not a great success. Motor is required to make the turns but it cruises along the ridge nicely.
Ansley Peace Drone - APD sloping
Orange slim wing
1.2m wing6.5" chord + 1.5" ailerons
20mm thick
Flaperons, elevator, rudder
Turnigy 2826/6 2200kV motor with 6x4 prop
600g flying weight
1300mAh battery
I made this plane to test the theory that a thinner airfoil is better than one that is too thick.
The slimmer wing works very well with a great glide slope and smooth controllable performance, none of the looping and stalling of the 2m wing. Mild aerobatics like loops and rolls were easy and it could fly inverted with heaps of elevator.
An electrical brown-out brought about the premature demise of this one, maybe due to my dodgy soldering. I have since upgraded to a more powerful soldering iron.
Orange slim wing maiden
Orange slim wing slope soarer
1.2m wing6.5" chord + 1.5" ailerons
20mm thick
Flaperons, elevator, rudder
450g flying weight
500mAh 3S battery
I rebuilt this one as a sloper, which basically means replacing the crunched motor mount nose with a longer battery-holding nose.
Awesome, it worked very well, nimble, light and easy to fly. Rolls were OK but inverted required heaps of elevator. Loops weren't possible.
Orange slim wing sloper
Next project is to try this glider with a symmetrical wing and Le Fish sized elevator and rudder.
Tuesday, 10 December 2013
Versus DLG setup
This video shows my DLG mixes on the Turnigy 9X
I swapped the Trainer momentary switch (top right) with the Throttle Cut On-Off switch (top left) so I could use the momentary switch for launch mode with my left hand.
Launch - 2mm up elevator on momentary switch with 2mm reflex (up flaperon) on full up throttle stick
Speed mode - Zero flaperon ID0, throttle stick centred (wide central flat band)
Cruise mode - 2mm camber (down flaperon) on ID1
Thermal mode - 4mm camber on ID2
Landing - Full down flaperon on full down throttle stick mixed with some down elevator
I also use a wrist strap so I don't drop the transmitter while launching.
Tuesday, 26 November 2013
Versus DLG maiden flight
Tuesday morning dawned with no commitments till midday and no wind or rain. Finally time to maiden the DLG.
In the meantime I had flashed my Turnigy 9X transmitter with the wonderful er9X firmware and created some mixes for my 3 main RC planes. I'll post about that in more detail soon.
Anyway here's the video from this mornings adventure. Steep learning curve for the DLG style fling but I can't wait for more and maybe catching that elusive thermal.
A few repairs required after I dropped the transmitter on the last launch and the Versus nose dived into the ground. Servo tray broke loose and there are a few cracks in the pod but easily fixed. Hand strap on the transmitter is the next addition.
Friday, 15 November 2013
Versus DLG build
The first time I saw the Discus Launch Glider video by Flite Test I was intrigued.


This MEGA discussion on RCGroups covers every aspect of the Versus DLG. 53 pages and counting but definitely worth skimming through.
Important tips picked up from that discussion...
1. Don't hold your finished Versus out horizontal by the wing tip, it may fold.
2. The tail boom in the kit is too long and needs to be cut down. More on that later.
The kit includes the fibreglass covered foam / carbon fibre wings, fibreglass covered balsa tail pieces, fibreglass body, carbon fibre tail boom and an accessories pack.


Aileron / Flaperon Push Rods


 Reinforce with the left over CF cloth and finishing resin without the tab in place
Not enough leftover cloth in my kit to use single pieces so I cut a few smaller patches to cover the area.


 I had some kevlar stunt kite lines laying around so that's what I'm using for the pull string. I used the push rod wire to make hooks for attaching to the servo arm and control horns


DLGs are highly refined, super light and stiff hand launched gliders. You launch the glider high into the air using a discus style spin and fling, then go hunting for thermals.
Have a look at David Windestal's brilliant DLG video with lots of unique camera angles, and this slow mo one too. Maybe you will see why I'm hooked.
Competition level carbon fibre DLGs can cost up to $1000, but the entry level Versus DLG kit from Hobby King is much more affordable at around $200.
Versus DLG kit

The kit doesn't include servos. Four good quality 5g micros are required so I went with the recommended Dymond D47. They're expensive at $30 each but tiny and powerful.
DLGs benefit from very light and accurate servos. Some flight modes require control surface deflections of 1.5mm or so. Cheap servos just can't do that repeatedly.
UPDATE 8th Dec 2013 - both aileron servos have stripped gears after 2 separate rough landings. Looking for tougher metal gear micros as replacements. Folks on the forums say D47s are not suitable for ailerons but OK for rudder and elevator.
Download the build manual pdf from the International HK site under "Files". It's OK but lacking in important details. Build logs are available here for the similar Topsky and here for the Versus.
This MEGA discussion on RCGroups covers every aspect of the Versus DLG. 53 pages and counting but definitely worth skimming through.
Important tips picked up from that discussion...
1. Don't hold your finished Versus out horizontal by the wing tip, it may fold.
2. The tail boom in the kit is too long and needs to be cut down. More on that later.
The kit includes the fibreglass covered foam / carbon fibre wings, fibreglass covered balsa tail pieces, fibreglass body, carbon fibre tail boom and an accessories pack.

My accessories pack was a bit random with an extra servo mount, 2 finger pegs and tabs but no balsa piece to mount the horizontal stabiliser.
The supplied tail boom is 700mm long but the plan has it at 650mm. The general consensus on RCGroups (and Hobby King support) is that 700mm is too long. You need to cut the boom to 650mm or less, otherwise you will need lots more weight on the nose to get the CG right. Cut the tail end not the pod end or you will never fit them together.
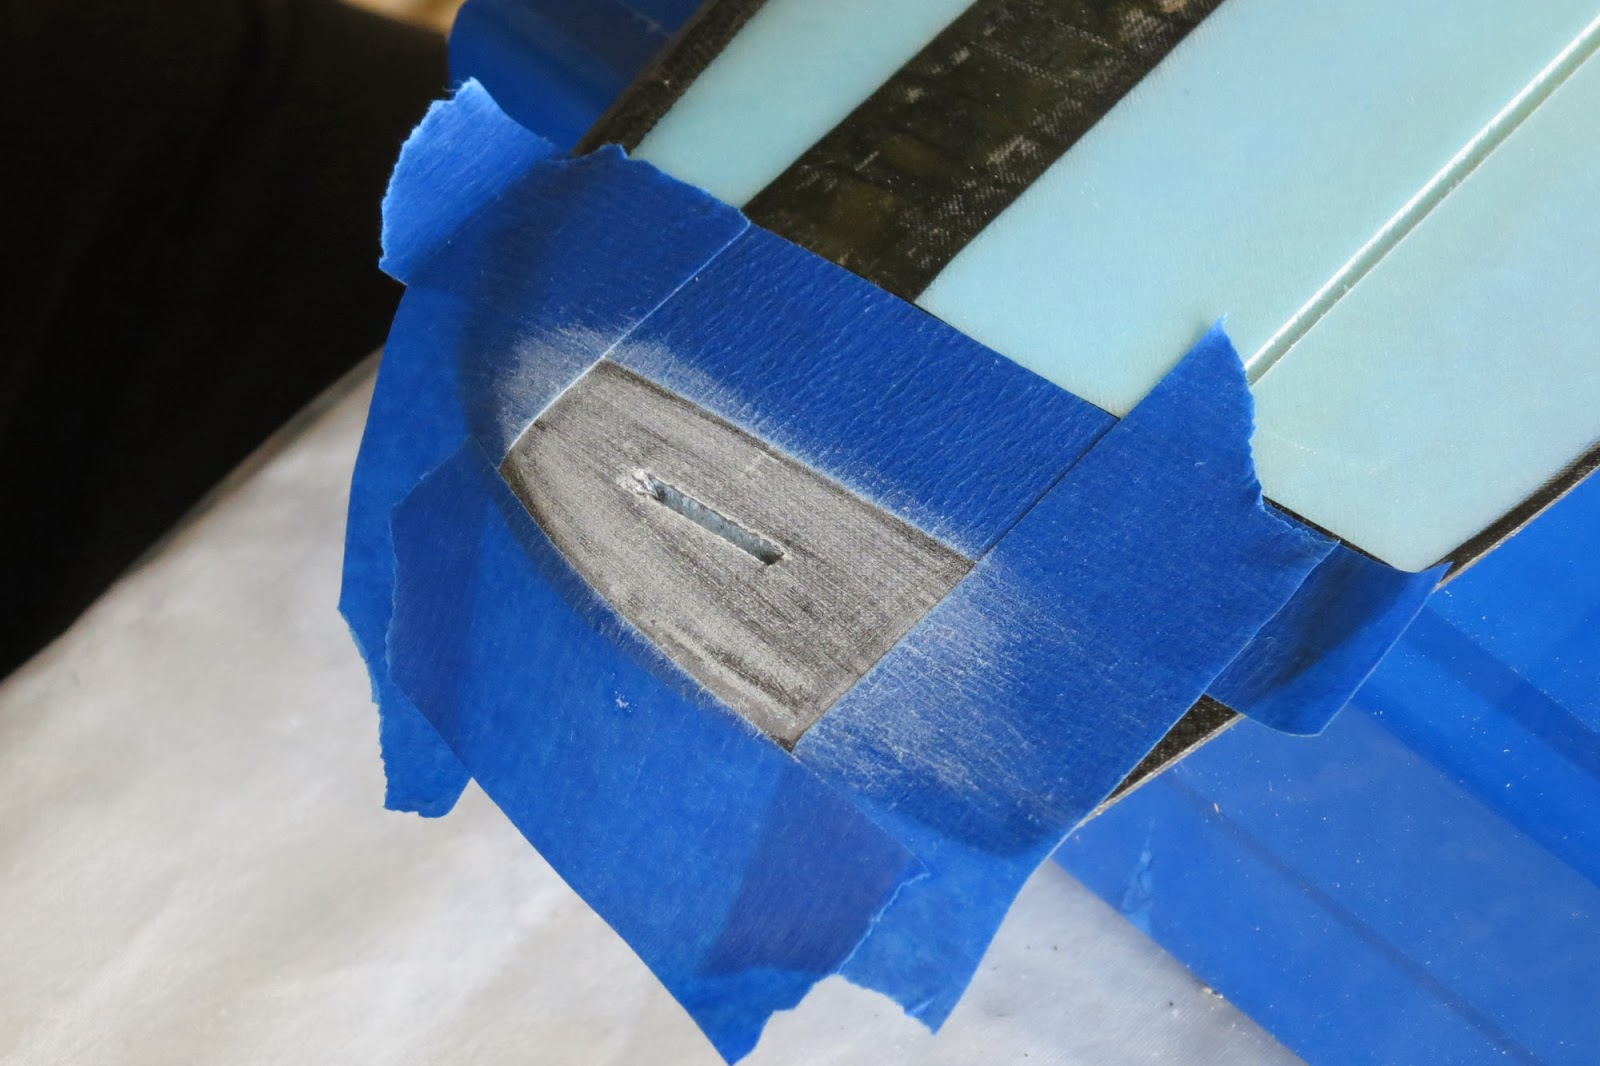
Wing attachment hard points

Step one is to gouge out the foam around the wing bolt holes to create hard points.

Make a 10mm deep and 25mm wide rectangular space centred around each half bolt hole

Fill with an epoxy resin and micro balloon mix. Micro balloons make the mix lighter, thicker and easier to sand. There are alternatives like Talcum powder which work just as well. I actually used micro fibres and West Systems 105 epoxy because that's what I had. Might be marginally heavier.

Let it cure overnight then sand down the raised areas so the wings fit together nicely.
Re-form the half bolt holes with a round file
Wing servos

The aileron servos mount into the underneath surface of the wing below the square carbon fibre patches. The manual shows the servo butting right up to the carbon fibre spar ribbon but that means you must cut into the ribbon to get full throws of the servo arm.
I moved my servos forward 5mm.
I moved my servos forward 5mm.

Use a sharp knife to cut through the fibreglass

Mill out the foam to the correct depth for your servo using a dremel
or carefully pick out the foam with some sort of pick.

Bore a hole through from the wing root for the servo lead. I used a drill bit by hand
Joining the wings

Tape the wings together along the undersurface using masking tape then turn the wing right way up. Glue the two wing halves together using epoxy glue (I used 5min Araldite) being careful not to fill the servo lead holes and bolt holes.

With one half of the wing weighted down lift the other tip up to 162mm to set the correct dihedral.

Support the lifted wing with something underneath making sure the join doesn't move out of alignment and let the glue cure. Once the glue has cured you can pick up and admire your full wing. Starting to look like a real glider now.
CF cloth reinforcing

Roughen up the top of the wing join with sandpaper to a width of
25mm then mask off with masking tape.

Cut two pieces of carbon fibre cloth to 25mm x 185mm. A roller cutter works well for this.
Mix up a small quantity of Epoxy finishing resin and paint some sparingly over the wing join.

Lay one piece of CF cloth onto the join and paint with more resin.
Use as little as possible just to make the cloth uniformly wet.

Blot up the excess with paper towel.
Lay some light plastic over the wet cloth to give a smooth finish when cured.

When the resin has cured re-form the bolt holes
by drilling through the CF cloth.

Reinforce the under side of the wing join following the same method.
When cured open up the bolt holes again by drilling.

Pick up your wing, marvel at your achievement and photograph it's gorgeousness (Optional)
Servos and control horns

The kit comes with a 4 pin connector but it was too small and fiddly for me to deal with so I opted to just extend the 2 servo leads to the receiver.
Cut the plugs off the servo leads and extension leads.
Cut the plugs off the servo leads and extension leads.

Thread servo extension leads through the holes and solder on to the servo leads
Make sure your extensions are long enough to reach the receiver. I used 150mm extensions.
Dont glue the servos down just yet.

Mark the control horn position on the aileron. The slot should start a few mm back from the hinge line to prevent the control horn poking through into the hinge gap.

Cut through the fibreglass with a knife to create the slot
and glue the control horn into position.
and glue the control horn into position.
Aileron / Flaperon Push Rods

Cut 2 x 30mm pieces of the thin wire and make small z bends.
Glue them to the CF push rods with epoxy.
I used heat shrink tube as well to hold them in place.

Use a servo tester or your transmitter / receiver to centre the servo arms.

First make sure the clevis fits on the CF push rod. I needed to enlarge the hole to make it fit. Drill out the end servo arm hole so the clevis pin fits through with no slop. Carefully mark and cut the CF rod to the correct length. Fit the clevis and attach to the servo arm.
I made the wire z bend on the flaperon end of the push rod because it fit perfectly in the existing control horn with no slop whereas it was too loose in the existing servo arm hole

Slide the clevis along the push rod until there is zero flaperon deflection with the servo arm centred. Drop on some CA glue to fix the clevis in position on the push rod.
Finger tab and tail control horns

My kit seemed to provide the choice of finger peg or finger tab. They both weighed the same so I went with the tab which would give less drag. Using a knife I cut the slot about 15mm in from the end and slightly overlapping the line of the CF ribbon spar as in the Versus manual.
Mask around the slot top and bottom, roughen with sandpaper.

Not enough leftover cloth in my kit to use single pieces so I cut a few smaller patches to cover the area.

Once cured and sanded reopen the slot and glue the finger tab in.
I used plenty of thickened 30min epoxy. This area needs to be strong.

Make sure the tab is vertical and aligned with the centre line.
Rudder and Elevator servos

Fit the servos into the plywood mount. The Dymond D47 screws are pretty chunky so I used some smaller 9g servo screws. You need to remove one servo to get it all inside the pod.

My servo mount was too narrow and didn't reach to the pod walls
so I glued in 2 balsa supports for it to sit on.
so I glued in 2 balsa supports for it to sit on.

Checking to see how all the bits fit in. You need a small battery to fit into the nose. Turnigy Nano tech 300mah 2C is a good fit but maybe not heavy enough. We shall see.

The Hobby King 6ch receiver is a little too big to fit so I removed the case
and replaced it with 25mm heat shrink. It fits easily now.
and replaced it with 25mm heat shrink. It fits easily now.
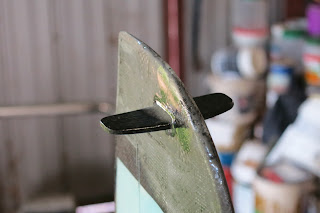
Boom length and tail pieces

Open the preformed slots in the tail pieces with a knife and glue the control horns in place.
They go on the opposite side to the kevlar hinge tape.

The tail boom is too long at 700mm. Recommended length is 650mm or less.
I chose to cut off 60mm giving 640mm. Cut from the narrow end not the wider pod end.

Cut slots in the end of the tail boom to fit the vertical stabiliser

Glue with epoxy using as little as possible. Any excess weight in the tail area should be avoided. Make sure the tail is vertical and perfectly aligned with the centre of the boom

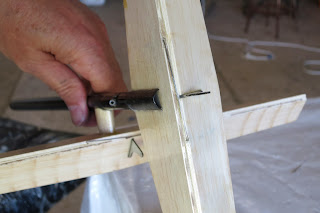
Glue 2 blocks of balsa together to form the horizontal stabiliser mount.
Size is 25mm front to back, 20mm high and 10mm thick

Shape it into a nice airfoil shape to reduce drag. Wrap sandpaper around the boom to shape the concave bottom surface so it fits snugly on the boom

Mark the centre line of the horizontal stabiliser

Tape it down flat and aligned with the lines running across a cutting mat

Now take a deep breath and relax. This part needs accuracy.
Glue the mount and boom on using 5 min epoxy
1. Vertical stabiliser must be at 90º to the horizontal stabiliser
2. Boom must be at 90º to the horizontal stabiliser.
Use the lines on the cutting board for reference
3. Height of the boom centre line must be the same at both ends.
I used pieces of foam board to support the boom at the right height.
There is a bit of debate on the forums about whether you should align the horizontal stabiliser with the top, bottom or centre of the boom. There doesn't seem to be a definite answer so I went with the centre. Seems logical to me.

If all that went well your tail section should look like this. Now to reinforce those joins with the supplied fibreglass cloth and epoxy finishing resin.

Cut fibreglass patches to cover either side of the rudder join and a longer piece to wrap around the boom and up either side of the elevator mount.
This fabric roller cutter works beautifully.

Paint resin on the joins then position the fibreglass cloth.

The manual says to spray with adhesive first but I find it too messy
and it makes repositioning the cloth difficult.

Wet out the cloth with more resin, sparingly of course.
Dab with the brush to remove any air bubbles
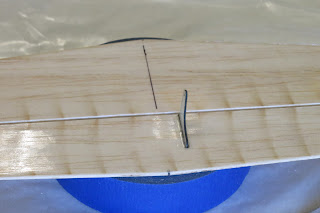
Spring / Pull tail hinges
I decided to try spring / pull control for the rudder and elevator. Main reason being I couldn't work out how to use the push rod and casing provided in the kit. The teflon casing is meant to run down the outside of the boom. I thought this looked ugly and drag inducing and I couldn't get the teflon to glue successfully. The spring / pull setup is an elegant solution and saves tail weight.
Drill angled holes for the pull string to exit from the boom

Glue in some plastic tubing for the string to run through


Using the 0.4mm push rod wire from the kit bend up 2 staple-shaped torsion springs.
Legs 25mm and middle 50mm

One leg is inserted into the balsa of the rudder and the other leg is inserted into the balsa of the vertical stab. Same for the elevator and horizontal stab.
This part is quite tricky.The wire wants to break out through the fibreglass as you push it in.
I ended up drilling holes and feeling with fingers on each side whether the drill was threatening to break through. I inserted some of the teflon tubing then inserted the wire legs.

The elevator hinge kept popping out so I had to glue the legs in the teflon tube and strengthened the surrounding area with CA glue.

Here it is all connected. Seems to be a fair force on the spring, hope the servos are up to it.
Final gluing, assembly and adjustments

To secure the wing servos they were wrapped in masking tape then glued in with 5 min epoxy. The idea is that I can remove, replace or reuse them if needed.

I had to remove the spring / pull lines to glue the pod to the tail boom

Making sure wing and horizontal stab are perfectly aligned

Final adjustment of the refitted spring / pull linkage.
I changed to a thinner kevlar line and 2:1 purchase loop to allow finer adjustment. Very fiddly trying to tie knots so the rudder and elevator are centred. No doubt I'll try different methods of fine adjustment, this one is not as clean as I'd like.

Checking the CG. The manual says 70 - 80mm back from the leading edge. Mine was about 90mm back unweighted. 15g extra in the nose brought it to 75mm.

Finished weight 275g or 290g balanced correctly. Now how do you fly these things?
Here's the narrated build video
Subscribe to:
Posts (Atom)