Search This Blog

Showing posts with label openTX. Show all posts

Friday, 3 July 2020

Invalid lines in OpenTX Telemetry log files


This message is very irritating when you're wanting to view a telemetry log file in OpenTX Companion.


Fortunately the fix is not too difficult.
The problem most likely is that the log file contains a column of values that are not relevant for your chosen radio.

For example, with my Taranis X9 Lite and Archer M+ receiver connected to a Matek F405 Wing board and all telemetry being logged, the file includes a column of nonsense values for SF. However there is no switch F on the X9-Lite.

OpenTX log files are in csv format, or comma separated values, and can be opened in any spreadsheet
program such as Excel in Windows or Numbers in Mac OS.

Open the log file in a spreadsheet program and look for the offending column and delete it. 


Then resave or export the file as CSV again.

Then the log file should open correctly using OpenTX Companion, and you should be able to display the GPS track in Google Earth.


SUBSCRIBE iNav Rover Mission


Thursday, 16 January 2020

Full House Glider OpenTX

Here is a full house setup for my Phoenix 2000, Taranis QX7, OpenTX 2.2.4 2019-07-12

Full span and normal ailerons
Crow braking with Elevator compensation
Full span camber adjustment

Connections
Ch1 Aileron Left
Ch2 Aileron Right
Ch3 Throttle
Ch4 Elelvator
Ch5 Rudder
Ch6 Flap Left
Ch7 Flap Right

Note that I have modded my Taranis QX7 to use the S1 knob as a left side slider, and swapped the momentary switch to the left side.

Mixes
> S1 operates Flaps down to the middle indent, then Crow braking from the middle to full down.
> Elevator compensation is set at zero weight and should be adjusted as required (My P2K pitches up with Crow activated so I needed -15% weight)
> SC up gives normal ailerons, then "not up" activates full span ailerons (and increased adverse yaw)
> SB adds full span camber in two steps
> SF up is the throttle cut

OTX model file here - https://drive.google.com/open?id=1QASpvvFY4mXdxKkhcV9NFY3wM9fXfIWo


Tuesday, 8 March 2016

OpenTX eepe and bin model files

Here are all my current models with downloadable OpenTX version 2.16 eepe files.
I use the Taranis plus for powered planes and thermal gliders where telemetry is useful,
and the Turnigy 9XR Pro for slope soarers at salty, sandy coastal sites.
I use spoken flight duration minutes on all models (not a global function)

Taranis Plus models (eepe files)

Global functions (apply to all models)
Volume adjust - RS (Right slider)
Save logs to SD card - SE switch not up

Fokker Dr1 triplane
A crowd favourite but very draggy and struggles in any wind. A slow flying spectacle.
Stig's head turns with the rudder and also full L or R with a switch.
 

Fokker Dr1 eepe file

Motor - Hextronic DT750
Prop - 11 x 5.5"
ESC - 40A
Battery - 4S 3000mAH
Sensor - 40A current

Receiver - X8R
1 - R aileron
2 - L aileron
3 - throttle
4 - elevator
5 - rudder
6 - Stig

Expo Ail Ele Rud - 30
Differential - 50
Rudder Aileron mix - 50
Throttle override - SE up
Stig on rudder and SA
Spoken CNSP and VFAS - SD up
Spoken current - SD middle

DH82 Tigermoth biplane
A very smooth and satisfying flyer capable of mild aerobatics.  Steady and reliable, great camera and FPV platform.

Tigermoth eepe file

Motor - Hextronic DT750
Prop - 11 x 5.5"
ESC - 40A
Battery - 3S 3000mAH
Sensor - 40A current

Receiver - X6R
1 - R aileron
2 - L aileron
3 - throttle
4 - elevator
5 - rudder

Expo Ail Ele Rud - 30
Differential - 50
Snapflaps - 20 (only for inverted flight or Ele stick forward)
Rudder Aileron mix - variable via S1 knob
Throttle override - SE up
Spoken CNSP and VFAS - SD up
Spoken current - SD middle

DH53 Hummingbird
A wonderful smooth flyer. Faster and more agile than the Tigermoth but still looks very retro.

Hummingbird eepe file

Motor - Sunnysky X2212 980kV
Prop - 11 x 5.5"
ESC - 40A
Battery - 3S 2650mAH
Sensor - 40A current

Receiver - X6R
1 - R aileron
2 - L aileron
3 - throttle
4 - elevator
5 - rudder

Expo Ail Ele Rud - 30
Snapflaps - 40 only for forward Ele stick (inverted flight)
Rudder Aileron mix - variable via S1 knob
Throttle override - SE up
Spoken CNSP and VFAS - SD up
Spoken current and RSSI - SD middle

Bixler 2
Classic motor glider, great camera platform and longer range FPV plane. Also a very smooth sloper.
Flap servos removed, flaps and ailerons taped together for full span flaperons.

Bixler 2 eepe file

Motor - Turnigy 2826 2200kV
Prop - 6 x 4"
ESC - 40A
Battery - 3S 2200 - 3000mAH
Sensor - GPS and 40A current

Receiver - X8R
1 - R aileron
2 - L aileron
3 - throttle
4 - elevator
5 - rudder
8 - beeper

Expo Ail Ele Rud - 20
Spoilerons - SF (momentary) down
Rudder Aileron mix - 30
Throttle override - SE up
Lost model beeper - SH down
Spoken CNSP and VFAS - SD up
Spoken altitude - SD middle
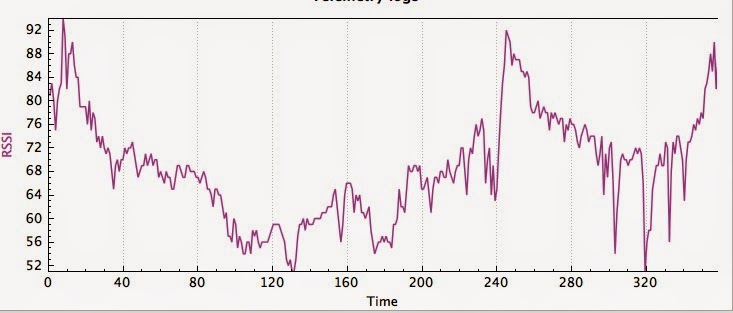
Spoken distance and RSSI - SD down
Spoken RSSI every 4 sec if RSSI less than 50 - always ON

Bixler 2 with Bigaole RTH Flight Controller

Bixler 2 RTH eepe file

Normal flight - SG up
Stabilised flight - SG middle
Return to Home - SG down
Failsafe sets throttle at 40% and activates SG down (RTH)

Receiver - X8R
1 - R and L aileron
2 -
3 - throttle
4 - elevator
5 - rudder
8 - lost model alarm

Sipkill Wing
Mad little wing for close in, ripping around on FPV

Sipkill Wing eepe

Motor - Turnigy 2822 1450kV
Prop - 7 x 4"
ESC - 30A
Battery - 3S 2200mAH

Receiver - DIY 801
1 - R elevon
2 - L elevon
3 - throttle

INPUTS
Ail
Rate 50% and Expo 50% - SC up
Rate 75% and Expo 50% - SC middle
Rate 100% and Expo 90% - SC down
Ele
Rate 60% and Expo 40%

MIXES
Ch1 -90 Ail -100 Ele
Ch2 90 AIl -100 Ele

Throttle override - SE up

Acrobat
Mad acrobatic plane with oversized control surfaces

Acrobat eepe file

Motor - Turnigy 2836 1000kV 
Prop - 10 x 4"
ESC - 40A
Battery - 3S 2200mAH

Receiver - X8R
1 - R aileron
2 - L aileron
3 - throttle
4 - elevator
5 - rudder

INPUTS
100 - 75 - 50 rates - SC
Expo Ail Ele  - 70, Rud - 60

MIX
Snapflaps - 20 

Throttle override - SE up
 
Radian
Motorised 3 channel thermal glider

Radian eepe file

Motor - stock
Prop - stock
ESC - Plush 40A
Battery - 1300 - 2200mAH
Sensor - Vario

Receiver - X4R
1 - rudder
2 - elevator
3 - throttle

Throttle override - SE up
Vario beeps - SD middle
Spoken altitude - SD down

V2 Discus Launch Glider
Entry level 1.5m composite DLG. The purest form of RC flight and great exercise.
I moved the momentary switch to SF (top left)

V2 DLG eepe file

BEC - Turnigy 3A
Battery - 2S 300mAH
Sensor - Vario

Receiver - X4R
1 - R aileron
2 - L aileron
3 - elevator
4 - rudder and BEC

Expo - none
Differential - R 70 and L -62 required for 15º up and down aileron range
Camber 0% - SA up
Camber 4% - SA middle
Camber 6% - SA down
Rudder Aileron 50% mix - SG up
Launch mode (Ele 18% up) - SF momentary down
Flap brakes with Ele compensation - Throttle stick full down


Turnigy 9XR Pro models with Turnigy 9X module (bin files)

Global function (applies to all models)
Volume adjust - P3

Speedy sloper
Strong wind fast sloper with no rudder. Flap or spoiler brakes on Thr stick.

Speedy sloper bin file
(For some unknown reason these save as bin rather than eepe. Same thing, they both work)

BEC - Turnigy 3A
Battery - 3S 1300 or 2200mAH (for weight)
Receiver - HobbyKing 3ch

1 - R aileron
2 - L aileron
3 - elevator and BEC

STICKS
Expo Ail - 30

MIXER
Flaperons and Spoilerons on Thr stick
Snapflaps - 30 for inverted flight only
Differential - 65 and -51

Fusion mad flipping sloper
Very agile light wind sloper with full flying mad elevator (90º up and 40º down).
Spring - Pull elevator and rudder.

Fusion bin file

BEC - Turnigy 3A
Battery - 3S 500
Receiver - HobbyKing 6ch

1 - R aileron
2 - L aileron
3 - BEC
4 - elevator
5 - rudder

STICKS
Expo Ail - 60
Expo Ele - 80

MIXER
Flaperons and Spoilerons via Thr stick - ELE switch down
Snapflaps - 20
Ele 100% - ID0
Ele 50% - ID1
Ele 20% - ID2

Le Fish mid weight
Very acrobatic VTPR sloper with full flying mad elevator
(VTPR - French for acrobatics close to the ground)

Le Fish bin file

BEC - Hobby King 5A
Battery - 3S 500mAH
Receiver - HobbyKing 6ch

1 - R aileron
2 - L alieron
3 - BEC
4 - elevator
5 - rudder

MIXER
Ail and Rud rates 50 to 100 variable via P3 knob
Ele rates same as above - ELE up
Ele rate 100* - ELE down (for mad flips)
* via an expo curve


Le Fish ultralight
Very acrobatic VTPR sloper for light winds

Le Fish ultralight bin file

BEC - Hobby King 5A
Battery - 3S 500mAH
Receiver - HobbyKing 6ch

1 - R aileron
2 - L alieron
3 - BEC
4 - elevator
5 - rudder

STICKS
AIL switch up
Ail - rate 100 expo 80
Ele - rate 100 expo 80
Rud  - rate 100 expo 80

AIL switch down
Ail - rate 50 expo 50
Ele - rate 60 expo 60
Rud  - rate 50 expo 40

MIXER
Snapflaps 30

Phoenix 2000 sloper
Big fast sloper for all conditions (no motor) Full house setup with flaps and ailerons.

Phoenix sloper bin file

BEC - HobbyKing 5A
Battery - 3S 1500 LiFE
Receiver - Turnigy 9X 8ch

1 - R aileron
2 - L alieron
3 - BEC
4 - elevator
5 - rudder
6 - R flap
7 - L flap

STICKS
Ail - expo 60
Ele - expo 40
Rud - expo 40

MIXER
Ailerons and flaps working as full span ailerons. Ail 100 Flaps 50
Snapflaps - Ail 50, Flaps - 16 and 12 for inverted flight

Full span Spoilerons on Throttle stick up
Wide central deadband
Crow brakes (Ailerons up Flaps down) on Throttle stick down


Tuesday, 3 March 2015

FrSKY Lipo voltage sensor

This sensor (cost about A$22) enables telemetry for the total battery voltage and individual cell voltages. Also called the FLVSS sensor.

It is small and lightweight and has a very clear OLED screen which means it can be used as a stand alone battery checker.

It plugs into the balance lead of the battery and connects to the X series receiver via the Smart Port.


This video covers connection and setup directly on the Taranis Plus transmitter. Spoken values and on-screen display of total voltage and the lowest individual cell voltage, with a little flight at the end.


FrSKY 40A current sensor

This sensor (cost about A$27) enables current, voltage and consumed mAh telemetry. This is one of the most useful modules for flying powered planes because it means you don't need to keep landing to check the battery level.

It plugs in-line between the battery and ESC and connects to the receiver via the Smart Port.

This video covers connection and setup using OpenTX companion, Taranis Plus transmitter and OpenTX 2.0. On-screen display and spoken voltage and mAh consumption values. Viewing of recorded logs in OpenTX companion.

Thursday, 26 February 2015

FrSKY Telemetry sensors

One of the most exciting functions of the Taranis X9D is telemetry. 
As well transmitting signals to the onboard receiver, the Taranis can receive data sent back from sensors on the plane. That data can be recorded on the SD card for later viewing, or presented live on the screen or even as spoken values and audio prompts.

In the next series of posts I will explain the functions of each sensor and how to get them working.

Here are four of the FrSKY telemetry sensors with the X8R receiver. 40A current sensor. LiPo voltage sensor. Variometer sensor. GPS sensor.

Each sensor is supplied with a female to female servo lead to connect it to the S-Port on the receiver. A second set of S-Port pins allows more than one sensor to be connected to the receiver at a time. You simply connect one sensor to the next in line.

Once correctly connected to a powered receiver the red LED on the sensor will change from fast flashing to slow flashing. That may take a few more minutes with the GPS.

At this stage the sensor is transmitting telemetry data but you can't see it anywhere. You need to go to the Special Functions screen for the current model to activate telemetry recording and sounds, or the Telemetry setup page for on-screen displays.

Activating SD logs

In the Special Functions screen select a switch (e.g. SG-), select "SD Logs" from the list of available functions, select how often telemetry data points are recorded (e.g. every 1.0s) Now whenever the SG switch is in the middle position telemetry data is recording onto the SD card.
SD logs include all the available telemetry data. RSSI (signal strength) and the position of every stick, knob and switch on the Taranis are recorded without any sensors required. With the appropriate sensors connected data like speed, position, altitude, distance, current, power usage and voltage are recorded. It's a mass of fascinating information to look at after your flight using OpenTX companion. If you're in to graphs you will love SD logs. 

Here are a few examples of what is available via OpenTX companion on your PC. 
I will go into more detail with each sensor in following posts.

Signal strength

Flight battery voltage

Current draw 

Telemetry display screens

To view the data in real time you need to go to the Telemetry setup page for your current model, scroll down to Screen 1 and select the values to be displayed. You can choose Bars for bar graphs or Nums for numbers on the screen.

In this example I have selected RSSI, Current and Timer 1 to be displayed on Screen1 of the telemetry screens. The 40A current sensor would be required in this case.
Here's how it looks on the live telemetry screen. Of course numbers greater than zero would appear if the plane was powered up and flying.

Spoken telemetry

The most useful way to present live telemetry is via sound or voice. Dependng on which sensors are connected the lovely lady in my Taranis can tell me such things as the altitude of my glider or how many mAH have been consumed, no need to look at the screen at all. 

To activate audio telemetry go to Special Functions, select a switch, select PlayValue, select which value to play and select how often to repeat.

In this example the Taranis will tell me the Consumed Power (Cnsp) in mAH every 10 seconds when the SC switch is down. (As long as the 40A current sensor is connected)

This is only scratching the surface of what is possible with the Taranis and OpenTX. 

There are logical switches to play with and LUA scripting as well. LUA scripts are like little programs that you can run on your transmitter. They can add functions like the Model Setup Wizard or extra graphical telemetry screens. There are hundreds of scripts available for download on the OpenTX forums. The possibilities are endless.

Friday, 13 February 2015

FrSKY Taranis and OPENTX 2.0

This is the FrSKY X9D TARANIS plus

It's a 16 channel transmitter that uses OpenTX open-source firmware. It has telemetry, sound, haptic (vibration) feedback and lua scripting capability. Telemetry logs are recorded on a micro SD card when activated.

For about A$250 this is a stunning transmitter. It must be one of the most programmable and adaptable transmitters currently available.

All the parts are easily replaceable and readily available from places like Banggood, Hobby King International and BoltRC in Australia.

There are no in-depth manuals for the Taranis or openTX but there are lots of online resources like OpenTX University, YouTube, and RCGroups.

I thought it would be a good idea to record the tweaks, mods and programming revelations as I progress. Mostly so that I don't forget them but also to share with like minded RC pilots.

Replacing the LCD

I cracked the LCD screen by dropping the Taranis onto a hard floor. It was in a backpack at the time but not a padded one. The Taranis still worked fine but not the screen. This video shows how to replace the screen. Very easy, no soldering, plug and play. New LCD bought from BoltRC in Perth for A$33 plus postage. Note that this video is for the Taranis plus. The original Taranis uses a different LCD. Some websites say that fine soldering is required but that refers to the backlight not the LCD.


Switching the switches

For DLG launching I like a momentary switch on the top left of the transmitter. Launch mode requires a brief blip of "up elevator" to rotate the DLG skywards, but my right hand is launching the glider, hence the need for a momentary switch on the left. 

As supplied the Taranis has a momentary switch on the top right and a 2 position switch on the top left.  Swapping them could not be easier. Both switches have their leads plugged. So you just need to open the back of the transmitter, unplug the leads from the switches, undo the retaining nuts and swap the SF and SH switches. Plug back in, replace the back and it's done.

Sunday, 1 December 2013

Turnigy 9X firmware upgrade


The Turnigy 9X 8ch RC transmitter is ridiculously cheap. $60 for a programmable 8ch! That's about 1/10th the price of comparable name brand transmitters.

But there's a catch (of course). The stock firmware or operating software is also ridiculous and there is no manual. There is this !manual but that was surely written as a joke. Here's an example explaining Mixes…

"Mix purpose to accuse of form to get rid of little mistake of organism, make it is it can take the heart conveniently even more to have not to handle. The very wanton one mixes accusing of among the channel."

You can sort of work out how to do some model programming by trial and error or by searching YouTube but to me most of it's functions were very quirky or a total mystery.

Now here's the exciting bit. Some brainiac called Thus rewrote the firmware completely (th9x) and made it available online and open source. The 9X was reborn and is now a fully configurable brilliant transmitter.

To load, or "flash", the new firmware you need to add some electronics to the 9X insides. You can do that very cheaply by soldering wires to 6 tiny pads on the main board and connecting a cheap programmer board, or it's much easier to pop in the solderless Smartieparts board. That's what I did along with the essential LCD backlight.


Open source coders are continually developing what started as th9X making improvements along the way. er9X, gruvin9X and openTX are some of the recent iterations.

er9X / eepe and Mac

The first version I tried was er9X with it's accompanying program epee both written by Erez Raviv (initials ER). Eepe handles the flashing process and allows backing up and editing of your model setups on your Mac.

Problem is...development of the mac version of epee stopped in early 2012 and it's no longer fully compatible with the current er9X.

You can still use epee to upgrade to er9X and have a brilliant transmitter but you can't save your model setups from the transmitter back onto your mac. Eepe for Mac no longer understands the eprom file generated by the current er9X. However there is an alternative.

openTX / companion 9X and Mac

Further investigation revealed that openTX (formerly called open9X) and the associated program companion9X are the more recent cousins of er9X and epee, and are fully mac compatible.


First you need to download and install companion9X. Go to the companion9X google code page and find the file called companion9x_1.51_Mac_Full_Setup.dmg

That's all you need, ignore references to AVRDUDE or drivers or compiling, they are not relevant.

UPDATE: Actually I'm wrong here. AVRDUDE is required for the 9X to talk to your mac and is automatically loaded with companion9X (up to v1.51).

Once companion9X is installed and working on your mac click on Preferences and you can select which flavour of the openTX firmware to download.

My selections are -
Firmware - openTX for 9X board
Default stick mode - Mode 2
Default channel order - AETR
Tick boxes - sp22

sp22 refers to "Smartieparts Board version 2.2" and the transmitter LCD backlight. If you have the backlight installed it will work in reverse from v2.2 onwards, OFF instead of ON, unless you check this box. I have the version 2.4 Smartieparts board.

You can experiment with the other choices but they are not as important.

The resulting downloaded firmware file will be named something like this
opentx-stock-templates-gvars-symlimits-potscroll-sp22-dblkeys-battgraph-thrtrace-pgbar-en-r2834.hex

Flashing the 9X firmware 

Now it's a simple matter of connecting your transmitter to your computer via the new USB port provided by the Smartieparts board. Open companion9X, turn on the transmitter, and click the flaming transmitter icon.

Click "Load Firmware" to choose the firmware version you just downloaded, hold your breath and click Burn to TX.

Your Turnigy 9X screen will go blank, you might see a Bad eeprom data message, click any button, and eventually you will see the openTX splash screen. Breathe again, your RC life will never be the same.

In openTX you now have the 8 actual channels on your 8 channel receiver plus 8 more virtual channels. The sticks, all 7 switches, 3 pots and 4 trim switches are configurable to do what ever you want. The possibilities are endless.

To learn how to setup your models in openTX I highly recommend Richard Mrazek's open9X tutorial. His er9X videos are totally relevant too. Don't be put off by his Czech accent, he is brilliant and funny. I don't trust any tutorials without a Czech accent now.