Search This Blog

Saturday, 7 March 2015

RC plane building materials

Latest Update Feb 2021


Carbon fibre
Skyshark P4X woven tubes - Wing spars and tail booms
7.54mm OD x 825mm (32.5") - Kites and fun things                
US$3.50 each. Freight is about US$45 to Aus. These are woven carbon fibre tubes, which are lighter than pulltruded tubes and less prone to splitting. Great for big kite spars also.

6 x 1mm and 3 x 0.5mm CF strip - light weight spars and reinforcing
2 to 5mm CF rod and tube - wing tie downs rods and elevator axle
12k CF tow (ribbon of unwoven fibres) - reinforcing and repairs

Rubber bands Size 64 (87 x 6mm) wing tie downs - Officeworks
Buy a 500g bag, they need frequent replacing. Dont buy the coloured version, they are weaker and fail sooner.

Laminating film and Packing tape
Iron-on document laminating film (covering)
3 mil (75 mic) is the most useful thickness, you can also use 1.7 mil (42.5 mic) for lighter builds. I bought 305mm wide rolls of GBC EZLOAD Lamination film but it may no longer be available

This laminate from Bound to Impress may be suitable but not tried by me 75 micron laminate


Scotch heavy duty exterior double sided tape (motor mount, servos) - Bunnings
Norton Bear cloth tape (reinforcing) - Bunnings
PPS clear 43 and 60 micron packing tape (covering, hinges) - Officeworks

PPS coloured packing tape (covering - 5 pack) - Officeworks
UPDATE: October 2015 - Looks like this coloured packing tape is no longer available at Officeworks. Need to buy Hobby King covering tape or Ebay from now on.
UPDATE: Jan 2016 - KMart now sells coloured packing tape (Thanks Joe)

Scotch Transparent Tough Tape (joining, reinforcing) - Bunnings
This is my favourite reinforcing tape but it's more expensive. Strong holding, flexible and lighter than cloth tape. Used to join wings, hold landing gear on and to reinforce control horns and hinges. Use cheaper Bear cloth tape where weight and strength are not as crucial.

3M Blenderm Tape for hinges - HobbyKing, Medical Supplier

Glue
Hot glue gun - Crescent 60W Bunnings and this 12V battery one from Hobby King
Brown Gorilla Glue
Accent Polyeurethane Glue - Mitre 10
Z-Poxy Epoxy finishing resin - ebay and Tates Hobbies Geelong
Foam Safe CA - Hobby King
Thread locker (Blue = releasable) for motor bolts - Supercheap Auto
UHU Por Foam safe contact glue - HobbyKing

Foamboard
If you cant get Flite Test or Adams foam board (only available in US), then depron is the best alternative.
Genuine depron is stiffer and stronger than other uncovered foamboards.

Beware - Paper-covered foam boards in Australia, like Quill from Officeworks, are much heavier and way more expensive than Dollar Tree foam board used by Experimental Airlines and Flite Test. Dollar Tree foam board is not sold in Aus so I use depron with tape or laminate covering. Depron is waterproof and lighter and much more durable than paper covered foam board.

Hot wire cutting bits
Knauf XPS insulation foam 30mm and 50mm thick - Bunnings
Hotwire wire - 40kg (90lb) single strand SS fishing wire
Template aluminium - 0.3mm Weatherflash window flashing

Bits and pieces
Blank ID cards - Search Ebay for CR80 blank ID cards
Piano wire for Push rods (0.047" or 1.1mm) or Landing gear (2.5mm to 3mm) - Tates Hobbies 
Linkage stoppers - Hobby King
Z-bend pliers (worth having) - Hobby King
DuPont connectors useful when you need more or less pins than three (servo style connector kit) - Search Ebay

Tuesday, 3 March 2015

FrSKY Lipo voltage sensor

This sensor (cost about A$22) enables telemetry for the total battery voltage and individual cell voltages. Also called the FLVSS sensor.

It is small and lightweight and has a very clear OLED screen which means it can be used as a stand alone battery checker.

It plugs into the balance lead of the battery and connects to the X series receiver via the Smart Port.


This video covers connection and setup directly on the Taranis Plus transmitter. Spoken values and on-screen display of total voltage and the lowest individual cell voltage, with a little flight at the end.


FrSKY 40A current sensor

This sensor (cost about A$27) enables current, voltage and consumed mAh telemetry. This is one of the most useful modules for flying powered planes because it means you don't need to keep landing to check the battery level.

It plugs in-line between the battery and ESC and connects to the receiver via the Smart Port.

This video covers connection and setup using OpenTX companion, Taranis Plus transmitter and OpenTX 2.0. On-screen display and spoken voltage and mAh consumption values. Viewing of recorded logs in OpenTX companion.

Sunday, 1 March 2015

FrSKY GPS sensor

This is the FrSKY GPS sensor which enables position, altitude, speed and distance data on the Taranis. Cost about A$49.


The UP side must face upwards with a clear view of the sky, under foam may be OK.

Once connected it takes a few minutes for the sensor to acquire satellites. 
When it is ready the red led will change from fast to slow flashing and Lat and Long will appear on the telemetry screen 3.


This video covers connection and setup, how to enable spoken altitude, speed and distance values, telemetry logging and displaying flight tracks in Google Earth.


Saturday, 28 February 2015

FrSKY Variometer sensor

This is a barometric pressure sensor which provides telemetry for vertical speed changes and altitude. These values are very useful for RC glider pilots looking for thermal lift. Cost about A$33 (Feb 2015)


The telemetry can be presented in a few different ways.

1. As beeps of varying pitch to indicate whether the glider is rising or sinking. Higher pitch beeps for rising or lift and lower pitch beeps when it's sinking.

2. As spoken altitude values. My preferred method.

3. As on-screen numbers. Not so good because you have to look away from the glider to see the screen.

4. As an altitude graph in OpenTX companion on your computer. (If SD card logging is enabled on the Taranis)


This video explains how to connect and setup the vario with a Taranis Plus running OpenTX 2.0, and with OpenTX companion on an iMac.


Thursday, 26 February 2015

FrSKY Telemetry sensors

One of the most exciting functions of the Taranis X9D is telemetry. 
As well transmitting signals to the onboard receiver, the Taranis can receive data sent back from sensors on the plane. That data can be recorded on the SD card for later viewing, or presented live on the screen or even as spoken values and audio prompts.

In the next series of posts I will explain the functions of each sensor and how to get them working.

Here are four of the FrSKY telemetry sensors with the X8R receiver. 40A current sensor. LiPo voltage sensor. Variometer sensor. GPS sensor.

Each sensor is supplied with a female to female servo lead to connect it to the S-Port on the receiver. A second set of S-Port pins allows more than one sensor to be connected to the receiver at a time. You simply connect one sensor to the next in line.

Once correctly connected to a powered receiver the red LED on the sensor will change from fast flashing to slow flashing. That may take a few more minutes with the GPS.

At this stage the sensor is transmitting telemetry data but you can't see it anywhere. You need to go to the Special Functions screen for the current model to activate telemetry recording and sounds, or the Telemetry setup page for on-screen displays.

Activating SD logs

In the Special Functions screen select a switch (e.g. SG-), select "SD Logs" from the list of available functions, select how often telemetry data points are recorded (e.g. every 1.0s) Now whenever the SG switch is in the middle position telemetry data is recording onto the SD card.
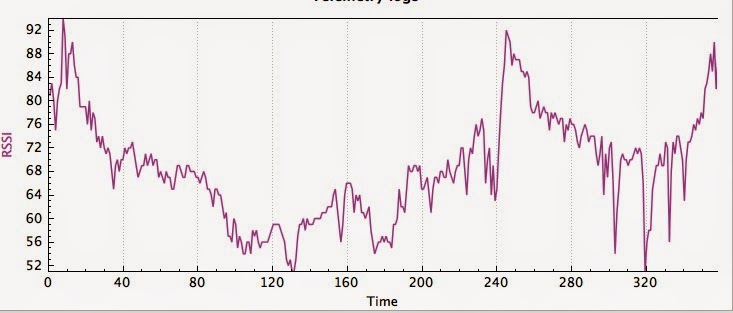
SD logs include all the available telemetry data. RSSI (signal strength) and the position of every stick, knob and switch on the Taranis are recorded without any sensors required. With the appropriate sensors connected data like speed, position, altitude, distance, current, power usage and voltage are recorded. It's a mass of fascinating information to look at after your flight using OpenTX companion. If you're in to graphs you will love SD logs. 

Here are a few examples of what is available via OpenTX companion on your PC. 
I will go into more detail with each sensor in following posts.

Signal strength

Flight battery voltage

Current draw 

Telemetry display screens

To view the data in real time you need to go to the Telemetry setup page for your current model, scroll down to Screen 1 and select the values to be displayed. You can choose Bars for bar graphs or Nums for numbers on the screen.

In this example I have selected RSSI, Current and Timer 1 to be displayed on Screen1 of the telemetry screens. The 40A current sensor would be required in this case.
Here's how it looks on the live telemetry screen. Of course numbers greater than zero would appear if the plane was powered up and flying.

Spoken telemetry

The most useful way to present live telemetry is via sound or voice. Dependng on which sensors are connected the lovely lady in my Taranis can tell me such things as the altitude of my glider or how many mAH have been consumed, no need to look at the screen at all. 

To activate audio telemetry go to Special Functions, select a switch, select PlayValue, select which value to play and select how often to repeat.

In this example the Taranis will tell me the Consumed Power (Cnsp) in mAH every 10 seconds when the SC switch is down. (As long as the 40A current sensor is connected)

This is only scratching the surface of what is possible with the Taranis and OpenTX. 

There are logical switches to play with and LUA scripting as well. LUA scripts are like little programs that you can run on your transmitter. They can add functions like the Model Setup Wizard or extra graphical telemetry screens. There are hundreds of scripts available for download on the OpenTX forums. The possibilities are endless.

Sunday, 15 February 2015

FrSKY X8R and X4R receiver connections

The latest receivers for the Taranis are the X series. They are  telemetry, S-Port and S-Bus capable.

I don't really understand S-Bus at this stage, it has something to do with connecting another receiver for more channels or many S-Bus servos into one plug.

However I do use the S-Port for connecting telemetry modules. On the X8R the S-Port is a servo style connector - easy. But on the X4R the S-Port is a different 4 pin socket. A 4 pin plug with 4 bare ended wires is supplied so you need to make up your own servo style plug.

This video shows what I'm talking about