Search This Blog

Thursday, 26 February 2015

FrSKY Telemetry sensors

One of the most exciting functions of the Taranis X9D is telemetry. 
As well transmitting signals to the onboard receiver, the Taranis can receive data sent back from sensors on the plane. That data can be recorded on the SD card for later viewing, or presented live on the screen or even as spoken values and audio prompts.

In the next series of posts I will explain the functions of each sensor and how to get them working.

Here are four of the FrSKY telemetry sensors with the X8R receiver. 40A current sensor. LiPo voltage sensor. Variometer sensor. GPS sensor.

Each sensor is supplied with a female to female servo lead to connect it to the S-Port on the receiver. A second set of S-Port pins allows more than one sensor to be connected to the receiver at a time. You simply connect one sensor to the next in line.

Once correctly connected to a powered receiver the red LED on the sensor will change from fast flashing to slow flashing. That may take a few more minutes with the GPS.

At this stage the sensor is transmitting telemetry data but you can't see it anywhere. You need to go to the Special Functions screen for the current model to activate telemetry recording and sounds, or the Telemetry setup page for on-screen displays.

Activating SD logs

In the Special Functions screen select a switch (e.g. SG-), select "SD Logs" from the list of available functions, select how often telemetry data points are recorded (e.g. every 1.0s) Now whenever the SG switch is in the middle position telemetry data is recording onto the SD card.
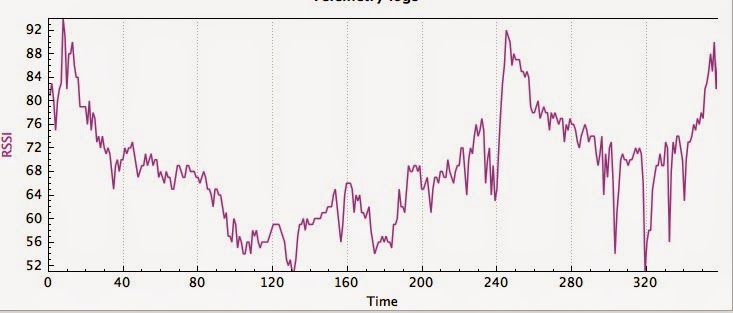
SD logs include all the available telemetry data. RSSI (signal strength) and the position of every stick, knob and switch on the Taranis are recorded without any sensors required. With the appropriate sensors connected data like speed, position, altitude, distance, current, power usage and voltage are recorded. It's a mass of fascinating information to look at after your flight using OpenTX companion. If you're in to graphs you will love SD logs. 

Here are a few examples of what is available via OpenTX companion on your PC. 
I will go into more detail with each sensor in following posts.

Signal strength
Flight battery voltage

Current draw 

Telemetry display screens

To view the data in real time you need to go to the Telemetry setup page for your current model, scroll down to Screen 1 and select the values to be displayed. You can choose Bars for bar graphs or Nums for numbers on the screen.

In this example I have selected RSSI, Current and Timer 1 to be displayed on Screen1 of the telemetry screens. The 40A current sensor would be required in this case.
Here's how it looks on the live telemetry screen. Of course numbers greater than zero would appear if the plane was powered up and flying.

Spoken telemetry

The most useful way to present live telemetry is via sound or voice. Dependng on which sensors are connected the lovely lady in my Taranis can tell me such things as the altitude of my glider or how many mAH have been consumed, no need to look at the screen at all. 

To activate audio telemetry go to Special Functions, select a switch, select PlayValue, select which value to play and select how often to repeat.

In this example the Taranis will tell me the Consumed Power (Cnsp) in mAH every 10 seconds when the SC switch is down. (As long as the 40A current sensor is connected)

This is only scratching the surface of what is possible with the Taranis and OpenTX. 

There are logical switches to play with and LUA scripting as well. LUA scripts are like little programs that you can run on your transmitter. They can add functions like the Model Setup Wizard or extra graphical telemetry screens. There are hundreds of scripts available for download on the OpenTX forums. The possibilities are endless.

Sunday, 15 February 2015

FrSKY X8R and X4R receiver connections

The latest receivers for the Taranis are the X series. They are  telemetry, S-Port and S-Bus capable.

I don't really understand S-Bus at this stage, it has something to do with connecting another receiver for more channels or many S-Bus servos into one plug.

However I do use the S-Port for connecting telemetry modules. On the X8R the S-Port is a servo style connector - easy. But on the X4R the S-Port is a different 4 pin socket. A 4 pin plug with 4 bare ended wires is supplied so you need to make up your own servo style plug.

This video shows what I'm talking about


Saturday, 14 February 2015

Taranis X9D vs Turnigy 9X battery plugs

Many RC pilots will upgrade from a Turnigy 9X transmitter to a Taranis X9D. It's a logical progression especially if both are running OpenTX firmware.

It is tempting to take the 9X battery and plug it into the Taranis, but it won't work. The plugs are the same but the wiring is different.


This photo compares the two plugs and wiring.

Friday, 13 February 2015

FrSKY Taranis and OPENTX 2.0

This is the FrSKY X9D TARANIS plus

It's a 16 channel transmitter that uses OpenTX open-source firmware. It has telemetry, sound, haptic (vibration) feedback and lua scripting capability. Telemetry logs are recorded on a micro SD card when activated.

For about A$250 this is a stunning transmitter. It must be one of the most programmable and adaptable transmitters currently available.

All the parts are easily replaceable and readily available from places like Banggood, Hobby King International and BoltRC in Australia.

There are no in-depth manuals for the Taranis or openTX but there are lots of online resources like OpenTX University, YouTube, and RCGroups.

I thought it would be a good idea to record the tweaks, mods and programming revelations as I progress. Mostly so that I don't forget them but also to share with like minded RC pilots.

Replacing the LCD

I cracked the LCD screen by dropping the Taranis onto a hard floor. It was in a backpack at the time but not a padded one. The Taranis still worked fine but not the screen. This video shows how to replace the screen. Very easy, no soldering, plug and play. New LCD bought from BoltRC in Perth for A$33 plus postage. Note that this video is for the Taranis plus. The original Taranis uses a different LCD. Some websites say that fine soldering is required but that refers to the backlight not the LCD.


Switching the switches

For DLG launching I like a momentary switch on the top left of the transmitter. Launch mode requires a brief blip of "up elevator" to rotate the DLG skywards, but my right hand is launching the glider, hence the need for a momentary switch on the left. 

As supplied the Taranis has a momentary switch on the top right and a 2 position switch on the top left.  Swapping them could not be easier. Both switches have their leads plugged. So you just need to open the back of the transmitter, unplug the leads from the switches, undo the retaining nuts and swap the SF and SH switches. Plug back in, replace the back and it's done.

Thursday, 12 February 2015

Phoenix 2000 sloper mods

The 2m Hobby King Phoenix 2000 was designed to be a motor thermal glider, but it works very well as a motor-less slope soarer.

Soren from Denmark, speedsterDEN on YouTube, has some amazing videos of sloping and dynamic soaring with this very cheap glider.


Slope soaring is fairly rough on foam gliders due to the rough and often uncontrolled landings.

The Phoenix has a tough plastic fuselage which is perfect for the job. However the wing and tail need some strengthening mods to help keep it in one piece.


My flap control horns pulled through the foam after a few flights so I added ID card plastic reinforcing to spread the load.
The wing is supplied with bolts and plastic caps to secure to the fuselage. These tore through the thin foam around the rear mounting bolt after a few rough slope landings. I decided to change to a rubber band tie-down mounting method for more durability. The wings were glued and taped together permanently.


I drilled 5mm holes in the fuselage to fit the CF tie-down rods. No reinforcing in this area is needed. The rods are held in place with hot glue.
Here is the wing securely held in place with rubber bands.


Below are videos explaining these mods and showing some flights.

Sloping along the sand

Sloping from the dune


Tuesday, 25 November 2014

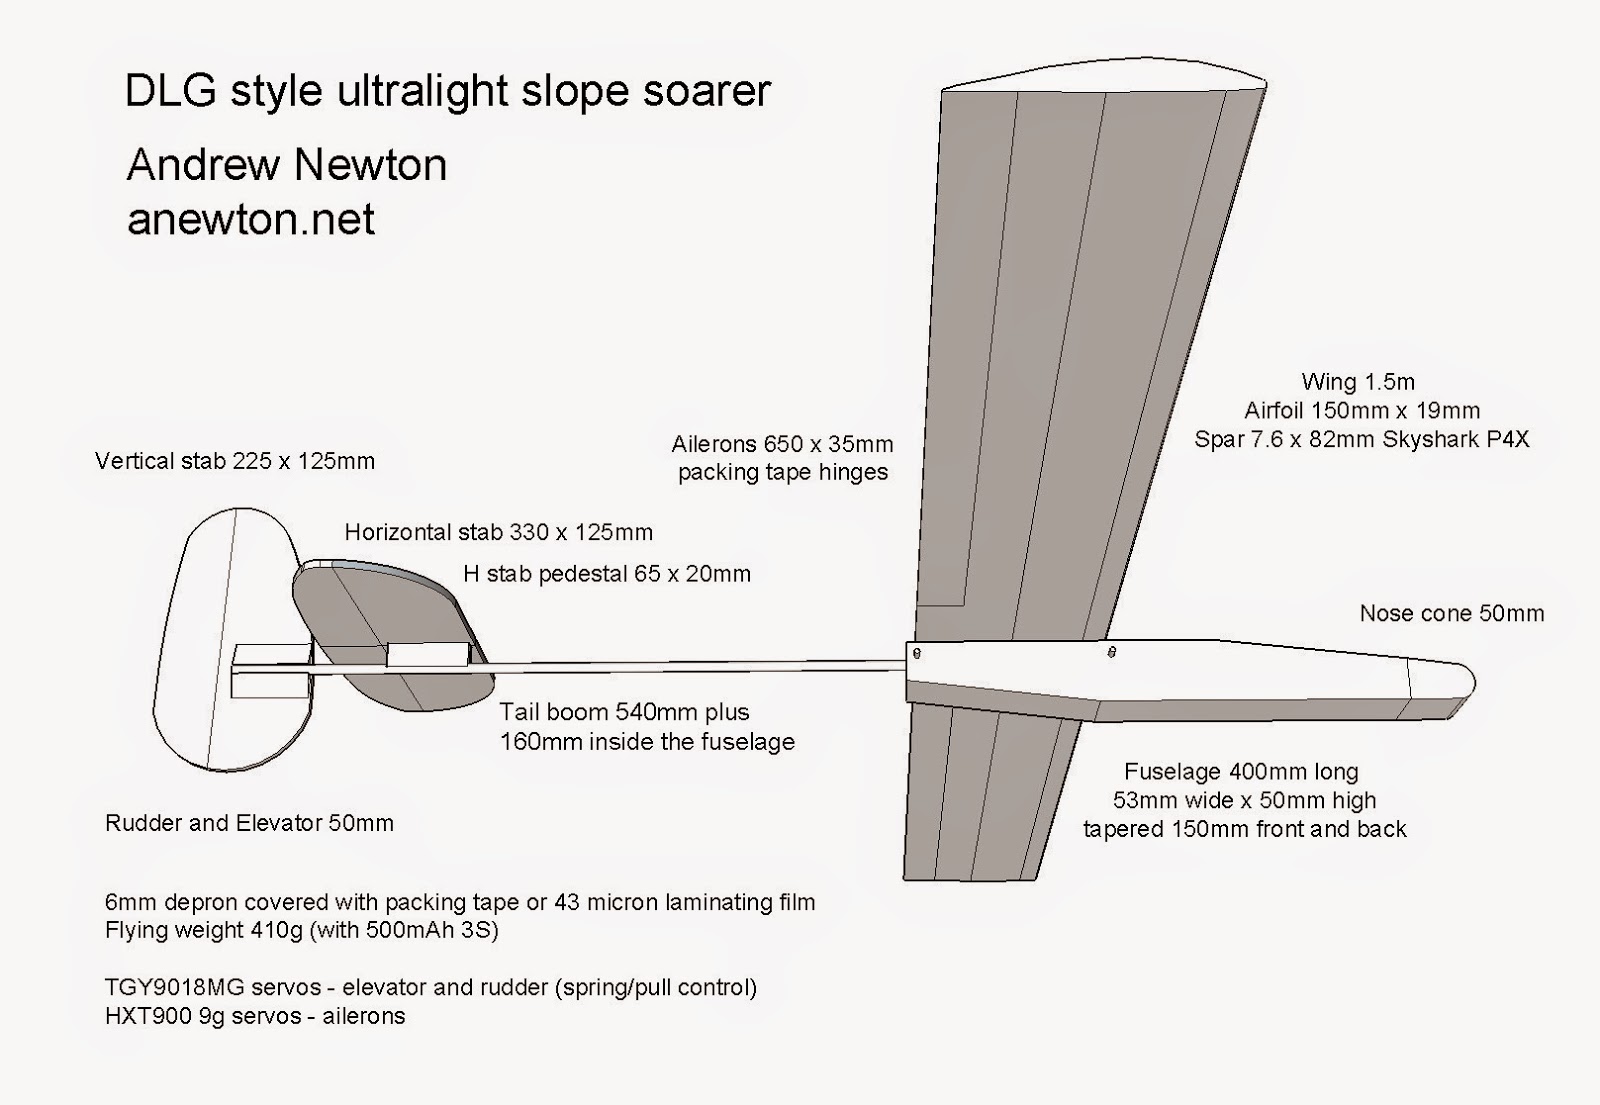
Ultra light slope soarer

The design for this lightweight aerobatic slope soarer was inspired by DLGs or discus launch gliders.
It will work in anything over 5kn on a decent slope and in 10kn it will work on any slope.

The rudder and elevator are operated by a pull line acting against a torsion spring.


This unique system means the servos can be forward in the fuselage and there are no pushrods going to the tail.


The trick is to make a torsion spring strong enough to operate the control surface against the airflow

but not so strong as to overpower the servo.

The 0.4mm SS wire provided as pushrods for the Versus DLG turns out to be perfect.


SPECS
Wingspan - 1.5m (65") Armin wing
Length - 104cmm (38")
Flying weight (500mAh LiPo) - 410g
Ailerons
Elevator
Rudder
TGY 9018MG servos x 2 (elevator and rudder)
HXT900 servos x 2 (ailerons)

MATERIALS

6mm depron
43 micron laminating film
60 micron clear packing tape
2 x Skyshark P4X spars (7.6mm x 820mm)
- Wing spar 820mm
- Tail boom 700mm
150lb Kevlar kite line (pull line)
0.4mm SS wire (torsion springs)
Soft packing foam (nose cone)
4mm CF rod (wing tie down bars)

Overview and build video


Aerobatics in 10kn


Testing with dihedral and no ailerons


New Stuff iron-on film - EZload laminate - GBC Australia

UPDATE March 2015: On really hot days the rudder and elevator servos have moved out of position as the glue softened. I have added more foam packing and glue to fix them securely. The trailing edge of the wing has also popped open twice. I removed the ailerons, re-glued then taped the join, then reattached the ailerons. In the original build, by cutting out the ailerons from the wing, I removed too much of the glue holding that join. 

Wednesday, 12 November 2014

1.65m (65") Twin Boom pusher

This twin boom pusher is similar to the 1.3m Depron Spectre, however it has a straight 1.65m (65") x 190mm depron Armin wing and twin rudders.

1.3m Depron Spectre and 1.65m Twin Boom pusher

Initially it was designed it as a 1.8m light-wind slope soarer but didn't perform as well as I wanted. The longer tail booms and larger wing span made it too flexy and delicate. I was also comparing the performance to a motorless Phoenix 2000, which is a sensational sloper.
Shortened tail booms and wingspan stiffened up the airframe nicely and the addition of a motor fuselage turned it into an excellent FPV cruiser and medium wind FPV sloper. It tracks well in a straight line and has a decent glide angle but is quite agile like the Spectre.

Instead of using packing tape to cover the depron I used document laminating film, often referred to as New Stuff in the RC world. It is ironed on with a warm iron before bending the airfoil and fuselage, and works very well. It's tougher and easier to apply than packing tape.

Construction
See the depron wing build and Spectre overview videos for the basics, and the Spectre post on this blog.

Additional strengthening ...

6x1mm CF strip glued along the front of the elevator.


Heat bent UPVC brackets for the rudder to elevator joins.


I used twin rudder servos rather than one servo and a long vulnerable connecting pushrod between the rudders. Full length wing spar made from 2 Skyshark P4X spars joined with an internal CF rod joiner and epoxy. 

SPECS
Wingspan - 1.65m (68")
Chord - 190mm (7.5")
Length - 100cmm (36")
Airframe weight - 840g
Flying weight (2200mAh LiPo) - 1040g
Motor - Turnigy 2836 1100kV (260W)
ESC 30A Plush
Prop - 10 x 6"
Ailerons
Elevator
Twin rudders
TGY 9018MG servos x 2 (ailerons)
HXT900 servos x 3 (elevator and rudders)


I can email the Sketchup file if required


Initial slope soaring tests