My much loved Versus DLG has been crashed and repaired many times and is looking a bit rough now. But it was a great intro to DLGs. Hobby King's big sale came along at just the right time. The updated Versus, now called the V2, dropped from A$450 to $280, couldn't resist that price.
The V2 has a disser construction wing, crossed CF ribbon reinforcing, and a kevlar pod but otherwise is identical to the Versus.
I bought the Plug N Fly version which is OK, but might have been wiser to get the ARF version and add my own servos.
Here are my detailed build videos showing strengthening and control mods.
After a few weeks the V2 is going well, feels like a better Versus. I wouldn't pay full price for it because there are many better alternatives available, but for the sale price it is excellent.
Sunday, 20 September 2015

Sunday, 2 August 2015
Balsa / fibreglass tails
Ages ago I came across this article by John Gallagher on wax paper bagging DLG tail surfaces, and ever since I have wanted to give it a go.
I'm working on a Fusion style pod and boom sloper designed by Leadfeather on RCGroups and thought bagged balsa tails would suit. My foam elevator is proving to be a bit delicate for repeated rough landings.

I'm working on a Fusion style pod and boom sloper designed by Leadfeather on RCGroups and thought bagged balsa tails would suit. My foam elevator is proving to be a bit delicate for repeated rough landings.

2.5mm x 75mm balsa sheet. Elevator will be 100mm wide so an extra strip needs to be glued on.
I'd probably use thinner balsa for DLG tails or sand down the 2.5mm.
Later I realised 100mm wide balsa is also sold at Bunnings.
Landing Gear
Here's how I make landing gear using 2mm piano wire for the axle
and 20 x 1.5mm aluminium flat for the struts.
Wheels are pool noodle foam glued to bottle caps.

Piano wire axle has a bend on one end
Saturday, 4 July 2015
Hot Wire foam cutting rig
A couple of things prompted me to try this traditional foam wing cutting method.

 1. Thick boards of XPS insulation foam appeared in Bunnings. Either I have been unobservant or they have just recently added this stuff to the product line. 30mm and 50mm thick 1200mm x 600mm boards are available for $12 and $20.

 1. Thick boards of XPS insulation foam appeared in Bunnings. Either I have been unobservant or they have just recently added this stuff to the product line. 30mm and 50mm thick 1200mm x 600mm boards are available for $12 and $20.
UPDATE 2025: Now replaced with Blue XPS boards at Bunnings. I have not tested it for hot wire wings yet.
2. There was an old PC power supply that was about to be trashed at work and I already had some 0.6mm MIG welding wire for the resistive wire.
I followed some online videos about getting 12V DC from the PC power supply. First time I turned it on the house safety switch tripped, so it went in the bin.

 Instead of a mains supplied power source I decided to try using a 3S LiPo, and it worked beautifully.
I'm using a watt meter to keep an eye on battery level, current and consumed mAh

The pine frame stretches the resistive wire across a 750mm span at the front. Tension is maintained by stretchy shock cord at the back.
Voltage is applied to heat the wire via alligator clips and I have an ON OFF switch on the frame. The LiPo connects via an XT60 plug.
Airfoil images and plots can be downloaded from The University of Illinois Airfoil Data Site. To make templates the airfoils need to be resized, printed then cut out of a rigid heat resisting material. I'm using 3mm MDF board but G10, formica and carbon fibre are also used.
The MIG wire broke mid cut a couple of times so I changed to 40kg stainless steel fishing wire and it's working well. It's 7 strand and nylon coated so the coating needs to be stripped off. I burned it off but it can also be easily peeled off using a knife.
UPDATE Jan 2016
I am now using a 4S Lipo for more heat in the wire, enabling a faster and smoother cut for 850mm wing halves.
2. There was an old PC power supply that was about to be trashed at work and I already had some 0.6mm MIG welding wire for the resistive wire.
I followed some online videos about getting 12V DC from the PC power supply. First time I turned it on the house safety switch tripped, so it went in the bin.

 Instead of a mains supplied power source I decided to try using a 3S LiPo, and it worked beautifully.
I'm using a watt meter to keep an eye on battery level, current and consumed mAh

The pine frame stretches the resistive wire across a 750mm span at the front. Tension is maintained by stretchy shock cord at the back.
Voltage is applied to heat the wire via alligator clips and I have an ON OFF switch on the frame. The LiPo connects via an XT60 plug.
Airfoil images and plots can be downloaded from The University of Illinois Airfoil Data Site. To make templates the airfoils need to be resized, printed then cut out of a rigid heat resisting material. I'm using 3mm MDF board but G10, formica and carbon fibre are also used.
The MIG wire broke mid cut a couple of times so I changed to 40kg stainless steel fishing wire and it's working well. It's 7 strand and nylon coated so the coating needs to be stripped off. I burned it off but it can also be easily peeled off using a knife.
Here's the "How to" video including a test flight.
As these wing cores are solid foam there is nowhere for the spar to fit.
This video shows three ways to form a spar channel.
UPDATE Jan 2016
I am now using a 4S Lipo for more heat in the wire, enabling a faster and smoother cut for 850mm wing halves.
The wire needs about 5A to heat up enough for cutting. I use 4S for my 850mm big bow, and 2S for my 40cm small bow.
Also changed to single strand 40kg SS fishing wire, which has resistance value of 4 Ohms per metre.
I have changed to thin aluminium sheet (window flashing) for the templates. Can be cut out with scissors.
I have changed to thin aluminium sheet (window flashing) for the templates. Can be cut out with scissors.
4S power and Aluminium template in use
Tuesday, 16 June 2015
SunnySky 2212 motors
The SunnySky X2212 KV980 motors finally arrived from Banggood. They went out of stock for a while, might have had something to do with reports of poor quality copies sneaking into Banggood's inventory. Apparently the supply problems have been resolved now.
 Mine seem to be genuine and do perform beautifully. They are smooth and efficient, giving about 50% longer flight times than the DT750 motors.
The Emax 10x4.5" props also from Banggood work well with this setup.

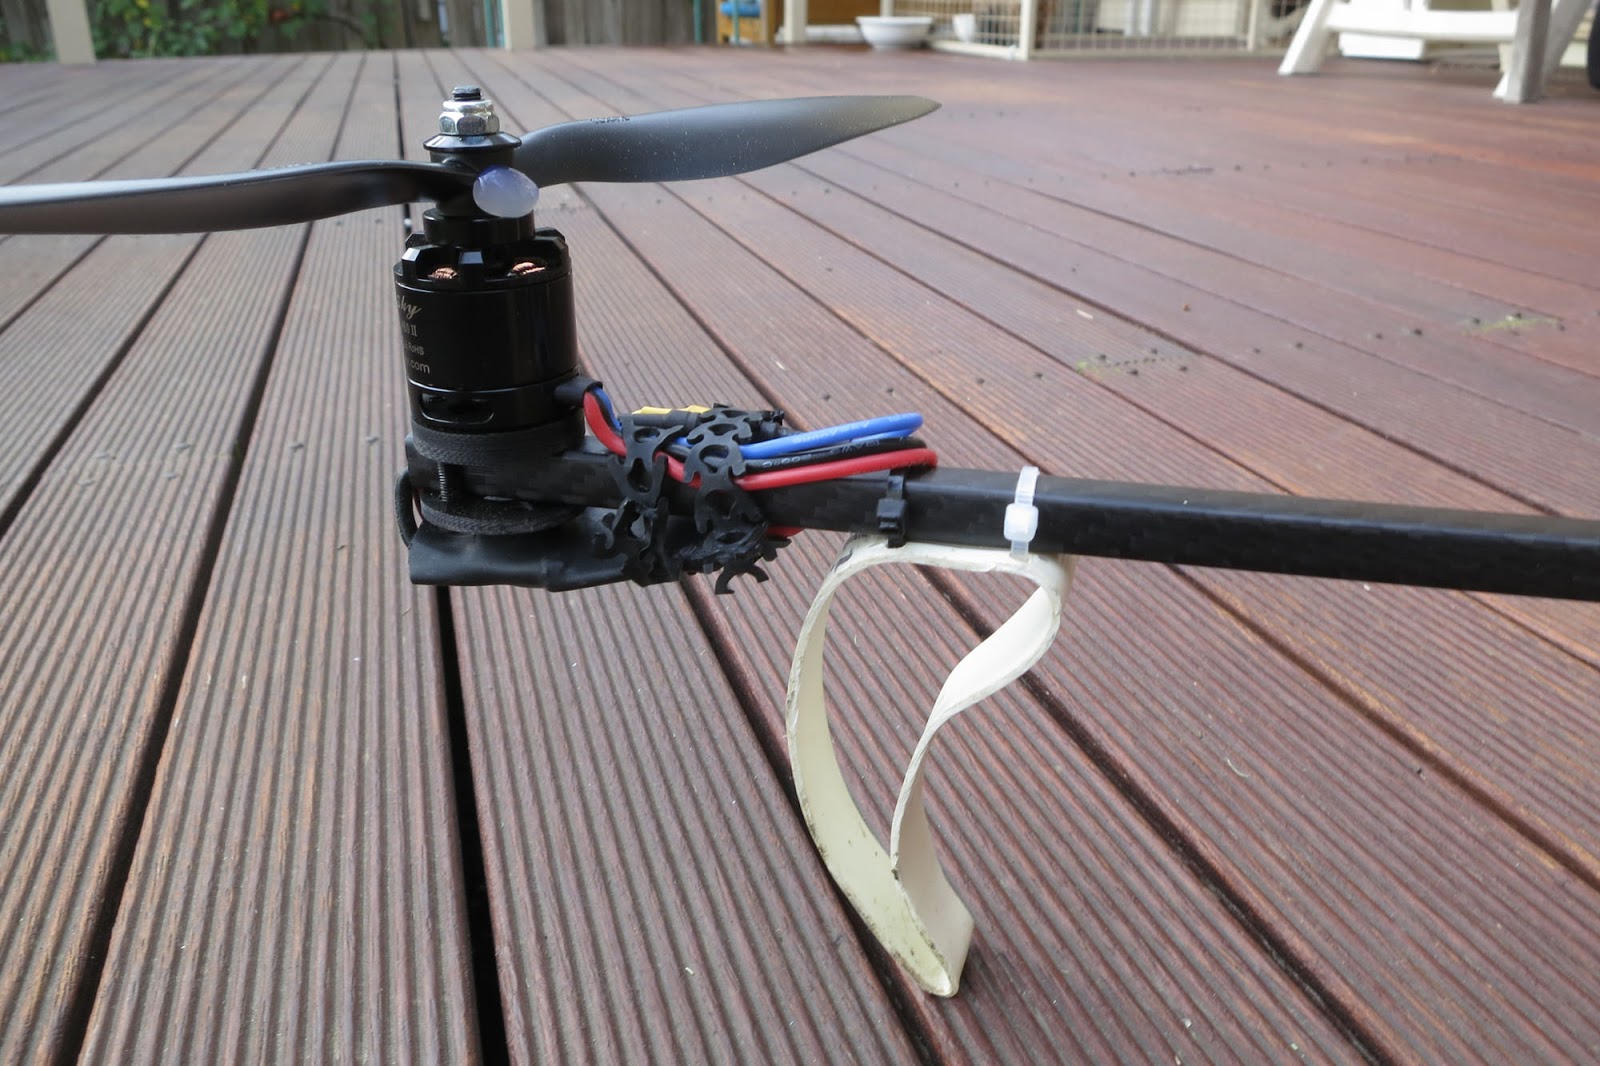
The Emax 10x4.5" props also from Banggood work well with this setup.

Sunday, 31 May 2015
Tricopter updates
Having established that I could build and fly a tri it was time to update to decent quality components.
 I bought carbon fibre arms, power distribution body (with onboard BEC) and tilt mechanism with Blue Bird digital servo from rcexplorer.se
Prices are very reasonable for these excellent components and postage is only US$7 from Sweden, better than most Australian outlets.
David's tricopter parts are almost works of art, especially the 10mm square woven carbon fibre arms.
From HobbyKing I bought Hextronic DT750 motors and some Turnigy Slow Fly 10x4.5 props.
Hextronic DT750 motors

I need to share my experiences with these DT750 motors. They are well suited to tricopters but do have some design faults which need to be dealt with first.
ESC wire support
The 3 wires are not flexible, just continuations of the single core windings, and will break with bending and vibrations. To prevent this they must be supported around the base with big blob of epoxy glue. I used 5min Araldite and it worked well.
Motor shaft "pull-up"
 The shaft is about 40mm x 4mm and threaded. In theory you don't need a vibration inducing prop adapter, just a nyloc nut. BUT unfortunately the shaft is not rigidly fixed to the motor bell. Tightening the nut enough to stop the prop slipping pulls the shaft up through the motor bell. This increases the bearing friction making the motor heat up and draw more current. The shaft is only held in the bell by one tiny grub screw, which is not enough to resist the "pull-up" from the prop nut.
I had some nasty crashes caused by a slipping tail prop because I couldn't tighten it down enough. Broke an arm and ruined an expensive digital servo.
The solution is to put a nut onto the shaft right down to the unthreaded part, then a washer, prop, washer and nyloc nut. That way the prop doesn't push down on the motor bell. Unfortunately I had already cut the shaft too short before I discovered this problem so have had to resort to bulky 4mm prop adapters.
Quest for the best propeller
 Turnigy Slow Fly 10x4.5 props are OK but very thin and flexible.
10x5 Gemfan Carbon nylon Graupner copies from Banggood are much stiffer but less efficient giving shorter flight times.
Emax 10x4.5 props from Banggood are a bit stiffer than the Turnigys and may be the perfect choice. Testing continues.

Prices are very reasonable for these excellent components and postage is only US$7 from Sweden, better than most Australian outlets.
David's tricopter parts are almost works of art, especially the 10mm square woven carbon fibre arms.
From HobbyKing I bought Hextronic DT750 motors and some Turnigy Slow Fly 10x4.5 props.
Hextronic DT750 motors

I need to share my experiences with these DT750 motors. They are well suited to tricopters but do have some design faults which need to be dealt with first.
ESC wire support
The 3 wires are not flexible, just continuations of the single core windings, and will break with bending and vibrations. To prevent this they must be supported around the base with big blob of epoxy glue. I used 5min Araldite and it worked well.
Motor shaft "pull-up"
 The shaft is about 40mm x 4mm and threaded. In theory you don't need a vibration inducing prop adapter, just a nyloc nut. BUT unfortunately the shaft is not rigidly fixed to the motor bell. Tightening the nut enough to stop the prop slipping pulls the shaft up through the motor bell. This increases the bearing friction making the motor heat up and draw more current. The shaft is only held in the bell by one tiny grub screw, which is not enough to resist the "pull-up" from the prop nut.
I had some nasty crashes caused by a slipping tail prop because I couldn't tighten it down enough. Broke an arm and ruined an expensive digital servo.
The solution is to put a nut onto the shaft right down to the unthreaded part, then a washer, prop, washer and nyloc nut. That way the prop doesn't push down on the motor bell. Unfortunately I had already cut the shaft too short before I discovered this problem so have had to resort to bulky 4mm prop adapters.
Quest for the best propeller
 Turnigy Slow Fly 10x4.5 props are OK but very thin and flexible.
10x5 Gemfan Carbon nylon Graupner copies from Banggood are much stiffer but less efficient giving shorter flight times.
Emax 10x4.5 props from Banggood are a bit stiffer than the Turnigys and may be the perfect choice. Testing continues.
Sunday, 10 May 2015
Tricopter build
Here's a quick and dirty tricopter build mostly using materials from my local hardware store.
It covers the basics of design and assembly. The tri flies OK but performance would be improved with more balanced motors and prop adapters and some P and I adjustments.
I haven't covered KK2 setup and tilt mechanism construction but David Windestal's has...
KK2 setup
Tricopter V2.5 build (including tilt mechanism)
It covers the basics of design and assembly. The tri flies OK but performance would be improved with more balanced motors and prop adapters and some P and I adjustments.
I haven't covered KK2 setup and tilt mechanism construction but David Windestal's has...
KK2 setup
Tricopter V2.5 build (including tilt mechanism)
Subscribe to:
Posts (Atom)