Sunday 22 September 2019

Best Cheap FPV gear

Here are my tips for the best cheap FPV gear.  Perfect for entry level or budget constrained pilots, but this gear will still be useful as your FPV requirements progress.

All In One camera and Video transmitter (AIO)

These camera / VTx combos are the simplest way to convert a plane to FPV. They are light and inexpensive and easy to swap from plane to plane.

The down sides are:
- The camera will not be the best quality, with lower dynamic range and large fisheye distortion.
- The range may not be as great as a more expensive Video Transmitter.
AOI VTx power output ranges from 25m to 200mW, giving range of maybe 100m up to many hundreds of meters.
- Voltage input is usually 3.5 to 5V. This means you cant run them straight from your flight battery. Best option for cleanest FPV video is to use a separate 1S battery for the FPV, or you can run it from the receiver or BEC.

Eachine TX02 200mW is my current recommendation - Eachine TX02 Banggood

FPV Goggles / screen

Recommending goggles is more difficult.

- Proper two screen goggles like Fatsharks, Skyzones and Aomway Commanders are very expensive, so I'll discount them for this discussion.
- Single screen box goggles are much cheaper but will not suit everyone. I need +1.0 close-up glasses for reading and I find that I cannot focus on the screen with most box goggles. I have modded some by glueing close-up lenses into the box enclosure.
- FPV screens by themselves can be a good solution but they are often more expensive than the box goggles.

Eachine EV800 goggles combine a detachable screen with goggles mount, so I think these are the best cheap option. The screen part can be mounted on a tripod or directly on your transmitter, and it includes the video receiver, battery and antenna. They also come with good quality antennas.


Eachine EV800 is the cheapest option with single clover leaf antenna - Eachine EV800 Banggood 


Eachine EV800D has clover leaf and patch antennas for greater range, and a DVR for recording the FPV feed - Eachine EV800D Banggood


Eachine EV800 screen on transmitter


Eachine EV800 review


Monday 1 July 2019

Collection of Fixed Wing iNAV tips

This page will record any clever Fixed Wing INAV tips I pick up over time.

Most of these tips come from
Facebook INAV Fixed Wing Group
Pawel Spychalski's YouTube Channel
INAV WIKI
and some very helpful YouTube subscribers.

1. Transmitter Trims (Pawel)
Transmitter trims should not be used, don't touch them. All trimming should be done by adjusting pushrod lengths, or using INAV Autotrim, or adjusting servo midpoints in INAV.
You can actually disable the transmitter trims.
In the Taranis Flight Modes screen change all the trim values on the default flight mode FM0 from (: 0) to (- -)
The trims will disappear from the transmitter screen and no longer be active  The trim switches now can be setup as normal switches for other uses. Which is quite useful because it's easy to run out of normal mode switches on transmitters like the QX7.

2. Only need one model setup (Stewie - UAVFutures)
Programming setup in your transmitter is identical for all iNav models. Wings, planes and even quads need the same 4 channels and mode switches. So you only actually need one iNav Model in your transmitter. Using the D16 protocol (not ACCESS) you can bind as many receivers as you need to this one OpenTX model if you set the receiver number to 00.
You can have all the extra functions like flaps and pan/tilt programmed in and just not use them on models that don't require them.

3. Forget about Angle and Horizon Modes (Pawel)
Well, maybe don't forget about them, but I never use Angle as an actual flight mode. With Angle Mode you have to hold the stick at the angle you want the plane to maintain. The board has to be perfectly aligned to maintain altitude in these modes. It's a self-level mode, which might appeal to beginners, but to me it feels like you have to fight the board to make the plane fly where you want. Horizon Mode is Angle Mode for the initial stick movement, then ACRO Mode for the rest of the stick movement. The change over point is something like 75% of the stick movement, and can be changed.

Angle Mode is necessary to initially setup the board alignment (mainly pitch degrees) and is automatically activated with the GPS modes. That's why when you select one of the GPS modes, before satellites are acquired, Angle Mode will be activated and shown in the OSD.
Angle is also useful on the bench to check that the control surfaces move in the correct direction for stabilisation.

I usually launch in Acro or Manual mode, fly around the field in Acro, go for an FPV cruise in Alt Hold, then use RTH to come back from a long way out.

I do still have Angle available as a mode for board alignment.

4. PIFF (PID) Tuning (Wiki, Pawel)
Increase FF until control surface movement in Acro (or Angle) is 90% of Manual Mode
This will give you all the control surface movement you need while saving some for stabilisation.
One of the biggest problems in a new iNav build is that you start with much less pitch and roll control  in Acro and Angle compared to Manual. I have been caught a few times with insufficient pitch control to get over trees while testing stabilised modes. 

My FF ends up at 50 to 100 depending on the model. P and I terms are less important for fixed wing. Mine seem to end up around P=7 and I=10 but I'll do some further PIFF testing to confirm.

Autotune attempts to do these adjustments for you, but doesn't always get it right. I prefer to set them in the field using the  iNAV OSD Menu. Access the OSD Menu by using the Enter OSD Menu Stick Command. You can make all the adjustments using your transmitter sticks.

UPDATE 10 Sept 2019: Pawel's latest tuning tips from this video.

1. Work out your roll pitch and yaw rates (degrees per second) by doing full stick rolls, loops and rudder turns, in manual mode. 
Example - If a full stick loop takes 2 seconds then the pitch rate is 180dps
Enter these rates into the Rates section of the PID Tuning page
Average rates are Roll - 250, Pitch - 150, Yaw - 90 (Ignore yaw when you don't have rudder)

2. PIFF Values
Change P to ZERO (Actually I think about 5 feels better)
Change I to 7 (around 6 to 8 and never more than 10)
Use AutoTune to set FF value (or increase FF to get 90% throws in ACRO)
Change Gyro LPF Cutoff to 20

3. CLI
Try set fw_iterm_limit_stick_position = 0.25 (Stick position where Angle changes to Acro. Default is 0.50) for a more natural and in control feeling, with stabilisation when sticks are near the centre.

5. Check List before your first flight

On the bench and hooked up to your computer

1. iNav Configurator Receiver screen - Ail, Ele, Thr and Rud values must increase when you move the transmitter sticks up and to the right. This means the stabilisation will work in the correct direction. If a channel value decreases instead of increasing, reverse the weight in your transmitter mixing.

2. Check that values range from 1000 to 2000 when you give full movement to the sticks. Adjust end points in your transmitter mixing if the range is out. I have to use -97 to +97 on my Taranis channel end points.

3. Check control surface movement using the transmitter sticks. If a servo is moving in the wrong direction go to the Servo screen in iNav Configurator and click Reverse for that servo.

4. Check that your Modes switches are working as expected and have one combination of switches that has no modes selected. For me it's all switches up. With nothing selected the plane will be in RATE / ACRO Mode

Outside or at the flying field

5. Check that the GPS is working and acquires more than 6 satellites. You will not be able to arm the board otherwise. Motor will not be active until the board is armed.

If all the above checks out you will be good to go. Time to be brave and throw that plane in the air.

Start in Manual Mode and fly up to a safe height, switch Manual off when you're flying calmly to see how ACRO mode performs. Be prepared to switch back to Manual if something unexpected happens.

Check other modes as your confidence builds.

6. Save your FPV OSD layout
Rather than having to setup the OSD again for every new iNav build you can copy the relevant CLI entries from a previous build, and save them as a text file. Then you can paste them into the CLI for the new build.

Type "Diff" into the CLI then hit Return
Copy all the lines starting with "# osd_layout" and save them in another text file.

osd_layout 0 lines refer to the Default layout
osd_layout 1 lines refer to Alternative layout 1
osd_layout 2 lines refer to Alternative layout 2
osd_layout 3 lines refer to Alternative layout 3

I have a text file with Default and Alt layout 1 saved and available to paste into each new setup.

Here are my OSD layouts at the moment. 
Default layout has Distance to Home and Trip distance included, but not in Alternative Layout 1 


7. Trim the Board Alignment in the field using Stick Functions
To get the plane flying level in Angle Mode you usually need to adjust the Pitch Degrees in the iNav configurator Configuration Screen. Rather than connecting to a computer you can do this using your transmitter sticks.

Have a look at the Mode 2 Stick Functions picture above.
If your plane descends when you switch to Angle Mode you need to add Pitch Degrees to the board alignment. Trim Acc Backwards is the stick function you will need.

With the board disarmed, push the throttle to full up and elevator to full down.
Watch the fast flashing LED on the board (Matek F405 Wing) and notice that it will start flashing slowly. One flash equals about 1/3rd of a degree of Pitch Degrees, so 10 flashes will trim by 3 degrees.

Fly again and adjust as required.
If the plane pitches up in Angle Mode try a few degrees of Trim Acc Forwards. Same for left and right.

My planes seem to need about +3.0 to 4.0 Pitch Degrees.

8. Default Mode is ACRO or RATE
If you have no modes selected you are actually in ACRO Mode (also called RATE), not MANUAL.
I use ACRO Mode 90% of the time for general flying around. ACRO is stabilised but not self levelling.

From the iNav fixed wing WIKI:

Default flight mode (No mode selected) 
The default flight mode does not self level the aircraft around the roll and the pitch axes. That is, the aircraft does not level on its own if you center the pitch and roll sticks on the radio. Rather, they work just like the yaw axis: the rate of rotation of each axis is controlled directly by the related stick on the radio, and by leaving them centered the flight controller will just try to keep the aircraft in whatever orientation it's in. This default mode is called "Rate" mode, also sometime called "Acro" (from "acrobatic") and is active whenever no auto-leveled mode is enabled. 

9. AIR MODE 

Air Mode is not a flight mode. It is a modifier function that ensured the PID loop (or stabilisation) is still active when the throttle is low or zero. 
Before INAV 2.6 the annoying thing about AIR mode was that it showed in the FPV OSD as the current flight mode. That has now been fixed so AIR MODE can be left ON all the time, but you will see the actual flight mode in the OSD.

10. ACRO actually does mean ACROBATIC

On planes with rudder, ACRO mode is designed for Assisted ACROBATIC flying, and not normal cruising around like we all expect. This means that you must use rudder for turns. If you try to turn without rudder input (bank and yank) iNav assumes you are trying to roll into a knife edge and keep flying straight. The rudder will act to resist the natural yaw of the turn.

To overcome this unexpected behaviour, Yaw P and I gains can set at zero. Then you can turn using bank and yank or do coordinated turns with rudder input. There will be no yaw stabilisation, but I would prefer that to unexpected knife edges. Or you can choose RC Yaw instead of Stabilised Yaw in the Mixer.

V-Tail planes have less effective rudders so this behaviour may not be so obvious. Flying wings dont have rudder so it is not an issue.

11. Turn Assist and Overactive Rudder can cause tip stalls in RTH and POS Hold

With Turn Assist activated iNav uses rudder, elevator and ailerons to turn in all the Nav modes. If you have noticed aggressive yawing, overshooting and maybe even tip stalls when you select RTH it's probably due to excessive rudder throws.

Reduce Rudder throws mechanically or reduce Yaw FF for safer and smoother GPS mode turns.

Or you can reduce the amount of rudder in the mix by reducing Turn Assist Gain via the CLI.
Turn Assist is ON by default even though it may not be activated in the Modes Page.
Gain is set at 1.0 with allowed range 0.0 to 2.0

Try gain values less than 1.0 to reduce the effect or turn it off with gain of 0.0.

Set fw_turn_assist_yaw_gain = 0.0

12. Prevent disarming in mid air (Marc Hoffmann)

I have often disarmed in the air by accidentally knocking the arming switch, requiring a glide back to earth with no power. I believe it is possible to re-arm in the air, as long as throttle is at zero and no modes are selected.

But there is a setting that will prevent disarming unless throttle stick is at zero.

set disarm_kill_switch=OFF

13. Horizon Drift (Marc Hoffmann)

Horizon drift is an error in roll axis levelling that occurs after prolonged banked turns.
It's only evident in GPS or autopilot modes, and shows as a tilted artificial horizon in the OSD.

To reduce Horizon Drift add the following line to the CLI

set imu_acc_ignore_rate=7


Wednesday 26 June 2019

Sky Hawk V2 Twin Fin Tail

I'm not convinced about the value of V and A tail configurations. They may serve practical purposes but seem to reduce yaw stability, and even pitch stability in turbulent wind.

So to try and improve the performance of the Sky Hawk I changed to a twin fin configuration.

Once I sorted out a twitchy elevator servo the results were very good.


Twin fins dimensions
150mm high
200mm long
50mm top

The forward extensions add strength and may help to organise the flow across the horizontal stabiliser.


Horizontal stabiliser is made from the old A-Tail halves, just cut off and glued together flat, with 20mm x 6mm depron added to the leading edge for extra area.


The wing foam flexes a bit around the boom mounts (shown by the icy pole sticks) so I may add some stiffening there


Flights with the new twin tail mod


Sunday 23 June 2019

Sky Hawk V2 Mods


This excellent 960mm wingspan A-Tail can be set up as a twin motor or a single pusher.

I really like it's size and adaptability, small enough for easy handling, but has heaps of internal space for big batteries and flight control boards. Very similar size and performance to the Talon GT


However there are a few things that can be improved.
It's a bit lacking in yaw stability, which basically means it wiggles in any wind, mainly due to the A-Tail being too small. I have added more tail area using 6mm depron which has reduced the wiggle.

The battery bay cover is flat, meaning thicker batteries will not fit. I'm using a 3000 4S which just fits, but a domed cover would allow room for Li-Ion bundles.

For the moment, to create more battery space I have cut off the nose tab and made a tape hinge for the cover


The twin motor set up is very cool and makes for a very fast plane with a sweet twin motor sound, but it's less efficient than a single pusher setup. I changed to a single 2212 980kV SunnySky motor with a 9 x 6" prop running on 3000mAH 4S. It cruises at under 4A and has heaps of extra power for fast fun. Suprisingly the weight dropped by 10g changing from twins on a 2200mAH 3S to single pusher on a 3000 mAH 4S.

I have also sliced off the boxy FPV camera mount under the nose for less drag and to reduce grass and mud entering the nose.

Flying weight - 700g without FPV and FCB
850g with all the gear.

Banggood - Sky Hawk V2 PNP / KIT 

Single motor maiden


I'm adding a Matek F411 Wing flight control board running iNav 2.1 (June 2019) with a Runcam Eagle camera and Eachine 5.8GHz 200mW VTx.

Strange behavior and crash video


Monday 3 June 2019

Smeg Head 1060mm Canard Pusher


This cruising FPV canard pusher is inspired by the Experimental Airlines APD

The original APD uses elevon mixing and a fixed canard, but I wanted to test ailerons and a separate elevator with a central fin.


Here is the Canard Center of Gravity calculator I used to get the balance right (after the maiden)

Maiden flight video


Build overview, mods and follow follow up flight


Carboard Box version

Tuesday 28 May 2019

RSSI for INAV - X8R L9R XM+

RSSI (Received Signal Strength Indication) is a measure of the RC signal strength between the RC transmitter and model.

Having RSSI as one of the OSD (On Screen Display) items in your FPV feed means you can see the signal strength as you are flying.


According to this excellent RSSI setup video by Droneracer101 there are 5 different ways to configure your receiver, transmitter and flight control board to enable RSSI for your OSD. He is demonstrating with Betaflight but the same setups work for iNav.

This post is just my interpretation of Droneracer101's instructions that relate to my three types of SBUS receivers.

1. X8R, X6R and X4RSB Telemetry receivers
The X series receivers transmit RSSI to your transmitter by default. You can use this value as an Input for a spare channel, which is transmitted back to the receiver / FCB.

On your Taranis

In the INPUTS page create a new input

I chose I-01 and renamed it I-RSI  but it can be any input.


Change Source to RSSI
Change Scale to 100dB


In the Mixer page create a new mix for a spare channel (eg. Ch 11 but can be any spare channel)


Change Source to I-RSI (I-01)
Change Weight to 200
Change Offset to -100

This adjusts the RSSI value to a meaningful number in the OSD


Using iNav configurator


Configuration page - Turn Analogue RSSI Off

Receiver page - change the RSSI channel to Ch11

OSD page - enable RSSI and position it where you want on the screen


2. XM+ SBUS receiver
Digital RSSI on SBUS Ch 8 or Ch 16 from receiver to flight control board.
Requires the specific firmware upgrade for the XM+ receiver.

XM+ RSSI firmware upgrade and OSD setup video

Once you have installed the RSSI firmware, follow the iNav Configurator instructions above but choose Ch 8 or Ch 16 depending on your firmware choice.

Ch 8 or Ch 16 must be spare in your Taranis.

3. L9R long range non-telemetry receiver. Analogue RSSI
Analogue RSSI via direct connection. This will only be possible if the FCB supports Analogue RSSI by providing a solder pad or pin, and the receiver provides an Analogue RSSI pin.

Matek F405 Wing and F722 Wing boards support Analogue RSSI. F411 Wing board requires MATEKF411_RSSI firmware to allow RSSI on the STI pin (Thanks for the update Samantha)

Connect the RSSI pin on the L9R receiver to the RSSI pin on the FCB. Only the signal wire is needed.

Configuration page - Turn Analogue RSSI On

Trouble shooting
If you are having problems getting the OSD information to show up in your FPV feed the issue may be your camera, TV standard choice or ground wire connection. 

Try swapping to a different camera. Some FPV cameras will not play nicely with iNav OSD and flight control boards.

Make sure you are consistent with your PAL or NTSC choices for camera, video transmitter and iNav OSD.

Make sure your camera and video transmitter share a ground connection.


Sunday 26 May 2019

Cardboard Canard Pusher


This canard pusher is made from the Sonic Modell Skyhunter Racing cardboard box.

Based on Ed's Ansley Peace Drone with a few mods.

I changed to a central vertical fin, and added a canard elevator rather than just elevons.

Here is a rough sketch plan. The design can be scaled to whatever box or materials you have.

CG is roughly half way between the canard and main wing.


Build and flight video


Some sloping in this video


Here's my original depron Ansley Peace Drone


Saturday 2 March 2019

INAV Basics - Trim and Modes

TRANSMITTER PROGRAMMING FOR INAV

IMPORTANT: Do not use any mixing, reduced rates, expo or trims in your transmitter.

The Flight Control Board handles all the mixing for you, including elevon mixing for wings and V-Tail mixing. All you need to do is program in 100% weight for each stick on Channels 1 to 4, and assign Mode switches to other channels.

My latest setup on the Taranis Q X7 (Sept 2019)

With all switches UP no mode is selected, so the board will be in the default mode, which is ACRO.

Ch1 100 Aileron
Ch2 100 Elevator
Ch3 100 Throttle
Ch4 100 Rudder
Ch5 Switch F - UP = Disarm. DOWN = Arm
Ch6 Switch B - MID = Angle. DOWN = Alt OSD 1
Ch7 Switch C -  MID = Nav Cruise DOWN = Position Hold
Ch8 Switch D -  MID = Manual. DOWN = Return to Home
Ch9 Switch A -  MID = Auto Trim. DOWN = Auto Tune 
Ch10 Left pot - OSD pages (3 different pages)

INITIAL SETUP OF YOUR PLANE OR WING

IMPORTANT: Do not trim the plane using the transmitter trims

There are three types of trimming required for consistant behaviour across all modes

1. Trimming the control surfaces for level flight in Manual mode

First you must fly the plane in Manual mode and adjust the push rods (not the transmitter trims) for "hands off" level flight. INAV will ignore the transmitter trims in all Modes apart from Manual.

If your pushrods are not adjustable you can use the new INAV Auto Trim mode. See below for details.

2. Trimming the board alignment for level flight in Angle and Horizon modes

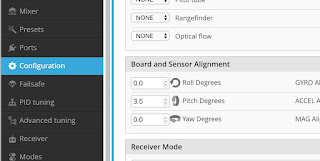
One of the most common problems with a new INAV installation is that the plane will lose altitude in Angle and Horizon modes. Don't be tempted to use the transmitter elevator trims to fix this behaviour.

Level flight in Angle or Horizon depends on the mounting alignment of the board. Most planes need some positive angle of attack or "nose up" to maintain altitude.


So it is usually necessary to add about +3 to +5 Pitch Degrees in the Configuration screen for the plane to maintain altitude in Angle / Horizon Mode. This depends on the plane and how you mount the board relative to the wing chord.

Angle and Horizon mode trim depends on board alignment (gyros and accelerometers)
Manual mode trim depends on control surfaces (Pushrods and servo angles)
GPS modes depend on GPS satellite information.

So you can see that switching out of a GPS mode may give nasty surprises if the control surfaces and board alignment are not quite right.

3. Auto Trim and Tune Modes

Auto Trim (for Manual Mode)
This mode attempts to adjust the servo mid points for level flight in Manual mode. Good for fine tuning trims once the pushrods have been adjusted correctly, or for fixed pushrods.

Pick a calm day, and while flying level in Manual mode, switch Auto Trim on.
The servo mid points over the first 2 seconds will be recorded.
If you are happy that the plane stayed level during those 2 seconds leave Auto Trim On and land the plane, disarm the board and the new trims will be saved.

Auto Tune (for Stabilised Modes)
This is another new mode that attempts to tune your PIFF values (Proportional, Integral and Feed Forward) for smooth stabilised flight with good control from stick inputs. INAV will learn how much control you need after analysing the reaction of the plane to your stick inputs.

Note: FF is the fixed wing replacement for D (Derivative).

Pick a calm day, launch and fly with no modes selected. The plane will be in Acro/Rate Mode (AIR will show in the OSD) if no other modes are selected. Activate Auto Tune once you are flying comfortably.

Fly around giving full aileron stick movements left and right for at least 30sec, then repeat for the elevator, then the rudder. Initially the response will be very mild, but movement will increase as the test goes on.

Keep repeating the movements for a few minutes until the change in behaviour stabilises. Auto Tune records the new PIFF values every 5 seconds.

Turn Auto Tune OFF in the air, then land, let the plane sit for a few seconds then disarm.
The new PIFFs have not yet been permanently saved to the board. You need to Save with Stick Commands, or connect a Laptop and save using INAV Configurator.

Stick Commands
This is the simplest way to save the new PIFFs
While the board is disarmed, push the transmitter sticks full down and away from centre. The new settings will be saved.


The new PIFFs can be checked by opening the full OSD menu.

With the board disarmed, push the Throttle stick to the center, Rudder stick full left, and Elevator stick full up.


Note: Some users have trouble bringing up the OSD successfully. There are a few tricks to this.

Throttle, Rudder, Aileron and Elevator outputs must be active with full range and the board disarmed.

That means you can't have Throttle Cut or Channel Override activated (different to disarm), you must have a Rudder channel setup (even for flying wings) and you must ensure your stick movements give the full range output (1000 to 2000) in the INAV configurator Receiver page.

Full list of stick Commands. Arm and Disarm are deactivated if you use switch arming.


INAV MODES
There are four types of Modes available in INAV.

Full control mode

Manual or Passthrough Mode
Normal flying with no stabilisation, only the Expo value in INAV is used. If something is going wrong with the FCB or GPS switch back to this mode to take control.

Stabilised modes 

Acro Mode, also called Rate
Slightly stabilised, holds the current orientation rather than self levelling, allows full control. Just stabilises against gusts and turbulence. Always active when no other mode is selected. Rudder will resist the turn unless you give some rudder stick input. 

Mode modifiers

These are not modes by themselves but they modify other modes

AIR
Keeps PID loop active at low throttle settings. Useful for stabilised gliding or landing

Altitude Hold
Holds the Altitude when selected but not self levelling. Uses barometer or GPS

Stabilised and Self Levelling modes 

These are Gyro and Accelerometer driven modes that rely on the board being level when the plane is in level flight attitude. Most planes fly level with the nose a few degrees up, so the board may need to be tilted down at the front, either in the mounting position or in INAV setup board alignment.

The Pitch Degrees required varies with different wings and different flying speeds. I usually start with +3.5ยบ and adjust from there after test flights.

Angle mode
Fully stabilised, bank and pitch angles limited, will return to level. Can't do loops and rolls in this mode.

Horizon made
Starts off like Angle mode but allows greater control as the sticks are moved further.

Launch Assist Mode
This is a magic mode. Select Launch Assist, arm the board, advance the throttle to a good launch percentage (the motor will not spin up yet) throw the plane and the motor will spin up 0.5 sec after the throw acceleration is detected. The plane will climb for 5 sec then switch into any other mode you have selected, or until you move the sticks. I have used Launch Assist and RTL combined, so I can can launch and let the plane circle above without picking up the transmitter. A big crowd pleaser.

It's important to get the switch sequence right for Launch Assist to work.

GPS modes
These are GPS controlled modes. Angle mode is automatically included for stabilisation.

Nav Cruise
Holds altitude and heading

Position Hold
The plane will circle around the point where the mode is selected, maintaining altitude and circle radius selected in INAV setup. 

Heading Hold
Uses rudder to hold the flight path to the heading when selected. Combine with Altitude hold for fixed heading and altitude flight path.

Return to Launch (RTL)
This is what it's all about. Enter this mode and the plane will fly back to where it was armed, at whatever altitude and throttle percentage you have setup in INAV, then circle overhead at the INAV setup altitude and radius (or even land automatically if you're game)

Failsafe RTL
For me this is the main reason for using iNINAVav. Failsafe can be setup to go into RTL mode, meaning that if you lose radio contact with your plane it will fly back home.
On FrSKY X series receivers I set the failsafe to No Pulses, then in INAV - Failsafe RTL - Don't Land.

Here is the INAV Fixed Wing guide which will answer most questions - iNav FW Wiki
Here are all my INAV related videos on YouTube - iNav Playlist