TRANSMITTER PROGRAMMING FOR INAV
IMPORTANT: Do not use any mixing, reduced rates, expo or trims in your transmitter.
The Flight Control Board handles all the mixing for you, including elevon mixing for wings and V-Tail mixing. All you need to do is program in 100% weight for each stick on Channels 1 to 4, and assign Mode switches to other channels.
My latest setup on the Taranis Q X7 (Sept 2019)
With all switches UP no mode is selected, so the board will be in the default mode, which is ACRO.
Ch1 100 Aileron
Ch2 100 Elevator
Ch3 100 Throttle
Ch4 100 Rudder
Ch5 Switch F - UP = Disarm. DOWN = Arm
Ch6 Switch B - MID = Angle. DOWN = Alt OSD 1
Ch7 Switch C - MID = Nav Cruise DOWN = Position Hold
Ch8 Switch D - MID = Manual. DOWN = Return to Home
Ch9 Switch A - MID = Auto Trim. DOWN = Auto Tune Ch10 Left pot - OSD pages (3 different pages)
INITIAL SETUP OF YOUR PLANE OR WING
IMPORTANT: Do not trim the plane using the transmitter trims
There are three types of trimming required for consistant behaviour across all modes
1. Trimming the control surfaces for level flight in Manual mode
First you must fly the plane in Manual mode and adjust the push rods (not the transmitter trims) for "hands off" level flight. INAV will ignore the transmitter trims in all Modes apart from Manual.
If your pushrods are not adjustable you can use the new INAV Auto Trim mode. See below for details.
2. Trimming the board alignment for level flight in Angle and Horizon modes
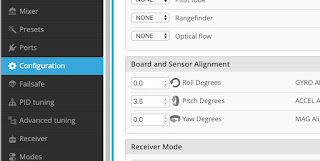
One of the most common problems with a new INAV installation is that the plane will lose altitude in Angle and Horizon modes. Don't be tempted to use the transmitter elevator trims to fix this behaviour.
Level flight in Angle or Horizon depends on the mounting alignment of the board. Most planes need some positive angle of attack or "nose up" to maintain altitude.
So it is usually necessary to add about +3 to +5 Pitch Degrees in the Configuration screen for the plane to maintain altitude in Angle / Horizon Mode. This depends on the plane and how you mount the board relative to the wing chord.
Angle and Horizon mode trim depends on board alignment (gyros and accelerometers)
Manual mode trim depends on control surfaces (Pushrods and servo angles)
GPS modes depend on GPS satellite information.
So you can see that switching out of a GPS mode may give nasty surprises if the control surfaces and board alignment are not quite right.
3. Auto Trim and Tune Modes
Auto Trim (for Manual Mode)
This mode attempts to adjust the servo mid points for level flight in Manual mode. Good for fine tuning trims once the pushrods have been adjusted correctly, or for fixed pushrods.
Pick a calm day, and while flying level in Manual mode, switch Auto Trim on.
The servo mid points over the first 2 seconds will be recorded.
If you are happy that the plane stayed level during those 2 seconds leave Auto Trim On and land the plane, disarm the board and the new trims will be saved.
Auto Tune (for Stabilised Modes)
This is another new mode that attempts to tune your PIFF values (Proportional, Integral and Feed Forward) for smooth stabilised flight with good control from stick inputs. INAV will learn how much control you need after analysing the reaction of the plane to your stick inputs.
Note: FF is the fixed wing replacement for D (Derivative).
Pick a calm day, launch and fly with no modes selected. The plane will be in Acro/Rate Mode (AIR will show in the OSD) if no other modes are selected. Activate Auto Tune once you are flying comfortably.
Fly around giving full aileron stick movements left and right for at least 30sec, then repeat for the elevator, then the rudder. Initially the response will be very mild, but movement will increase as the test goes on.
Keep repeating the movements for a few minutes until the change in behaviour stabilises. Auto Tune records the new PIFF values every 5 seconds.
Turn Auto Tune OFF in the air, then land, let the plane sit for a few seconds then disarm.
The new PIFFs have not yet been permanently saved to the board. You need to Save with Stick Commands, or connect a Laptop and save using INAV Configurator.
Stick Commands
This is the simplest way to save the new PIFFs
While the board is disarmed, push the transmitter sticks full down and away from centre. The new settings will be saved.
The new PIFFs can be checked by opening the full OSD menu.
With the board disarmed, push the Throttle stick to the center, Rudder stick full left, and Elevator stick full up.

Note: Some users have trouble bringing up the OSD successfully. There are a few tricks to this.
Throttle, Rudder, Aileron and Elevator outputs must be active with full range and the board disarmed.
That means you can't have Throttle Cut or Channel Override activated (different to disarm), you must have a Rudder channel setup (even for flying wings) and you must ensure your stick movements give the full range output (1000 to 2000) in the INAV configurator Receiver page.
Full list of stick Commands. Arm and Disarm are deactivated if you use switch arming.
INAV MODES
There are four types of Modes available in INAV.
Full control mode
Manual or Passthrough Mode
Normal flying with no stabilisation, only the Expo value in INAV is used. If something is going wrong with the FCB or GPS switch back to this mode to take control.
Stabilised modes
Acro Mode, also called Rate
Slightly stabilised, holds the current orientation rather than self levelling, allows full control. Just stabilises against gusts and turbulence. Always active when no other mode is selected. Rudder will resist the turn unless you give some rudder stick input.
Mode modifiers
These are not modes by themselves but they modify other modes
AIR
Keeps PID loop active at low throttle settings. Useful for stabilised gliding or landing
Altitude Hold
Holds the Altitude when selected but not self levelling. Uses barometer or GPS
Stabilised and Self Levelling modes
These are Gyro and Accelerometer driven modes that rely on the board being level when the plane is in level flight attitude. Most planes fly level with the nose a few degrees up, so the board may need to be tilted down at the front, either in the mounting position or in INAV setup board alignment.
The Pitch Degrees required varies with different wings and different flying speeds. I usually start with +3.5º and adjust from there after test flights.
Angle mode
Fully stabilised, bank and pitch angles limited, will return to level. Can't do loops and rolls in this mode.
Horizon made
Starts off like Angle mode but allows greater control as the sticks are moved further.
Launch Assist Mode
This is a magic mode. Select Launch Assist, arm the board, advance the throttle to a good launch percentage (the motor will not spin up yet) throw the plane and the motor will spin up 0.5 sec after the throw acceleration is detected. The plane will climb for 5 sec then switch into any other mode you have selected, or until you move the sticks. I have used Launch Assist and RTL combined, so I can can launch and let the plane circle above without picking up the transmitter. A big crowd pleaser.
It's important to get the switch sequence right for Launch Assist to work.
GPS modes
These are GPS controlled modes. Angle mode is automatically included for stabilisation.
Nav Cruise
Holds altitude and heading
Position Hold
The plane will circle around the point where the mode is selected, maintaining altitude and circle radius selected in INAV setup.
Heading Hold
Uses rudder to hold the flight path to the heading when selected. Combine with Altitude hold for fixed heading and altitude flight path.
Return to Launch (RTL)
This is what it's all about. Enter this mode and the plane will fly back to where it was armed, at whatever altitude and throttle percentage you have setup in INAV, then circle overhead at the INAV setup altitude and radius (or even land automatically if you're game)
Failsafe RTL
For me this is the main reason for using iNINAVav. Failsafe can be setup to go into RTL mode, meaning that if you lose radio contact with your plane it will fly back home.
On FrSKY X series receivers I set the failsafe to No Pulses, then in INAV - Failsafe RTL - Don't Land.
Here is the INAV Fixed Wing guide which will answer most questions -
iNav FW Wiki
Here are all my INAV related videos on YouTube -
iNav Playlist

 Twin fins dimensions

 The wing foam flexes a bit around the boom mounts (shown by the icy pole sticks) so I may add some stiffening there


