What to check if your INAV setup is misbehaving
1. Flight Control Board orientation
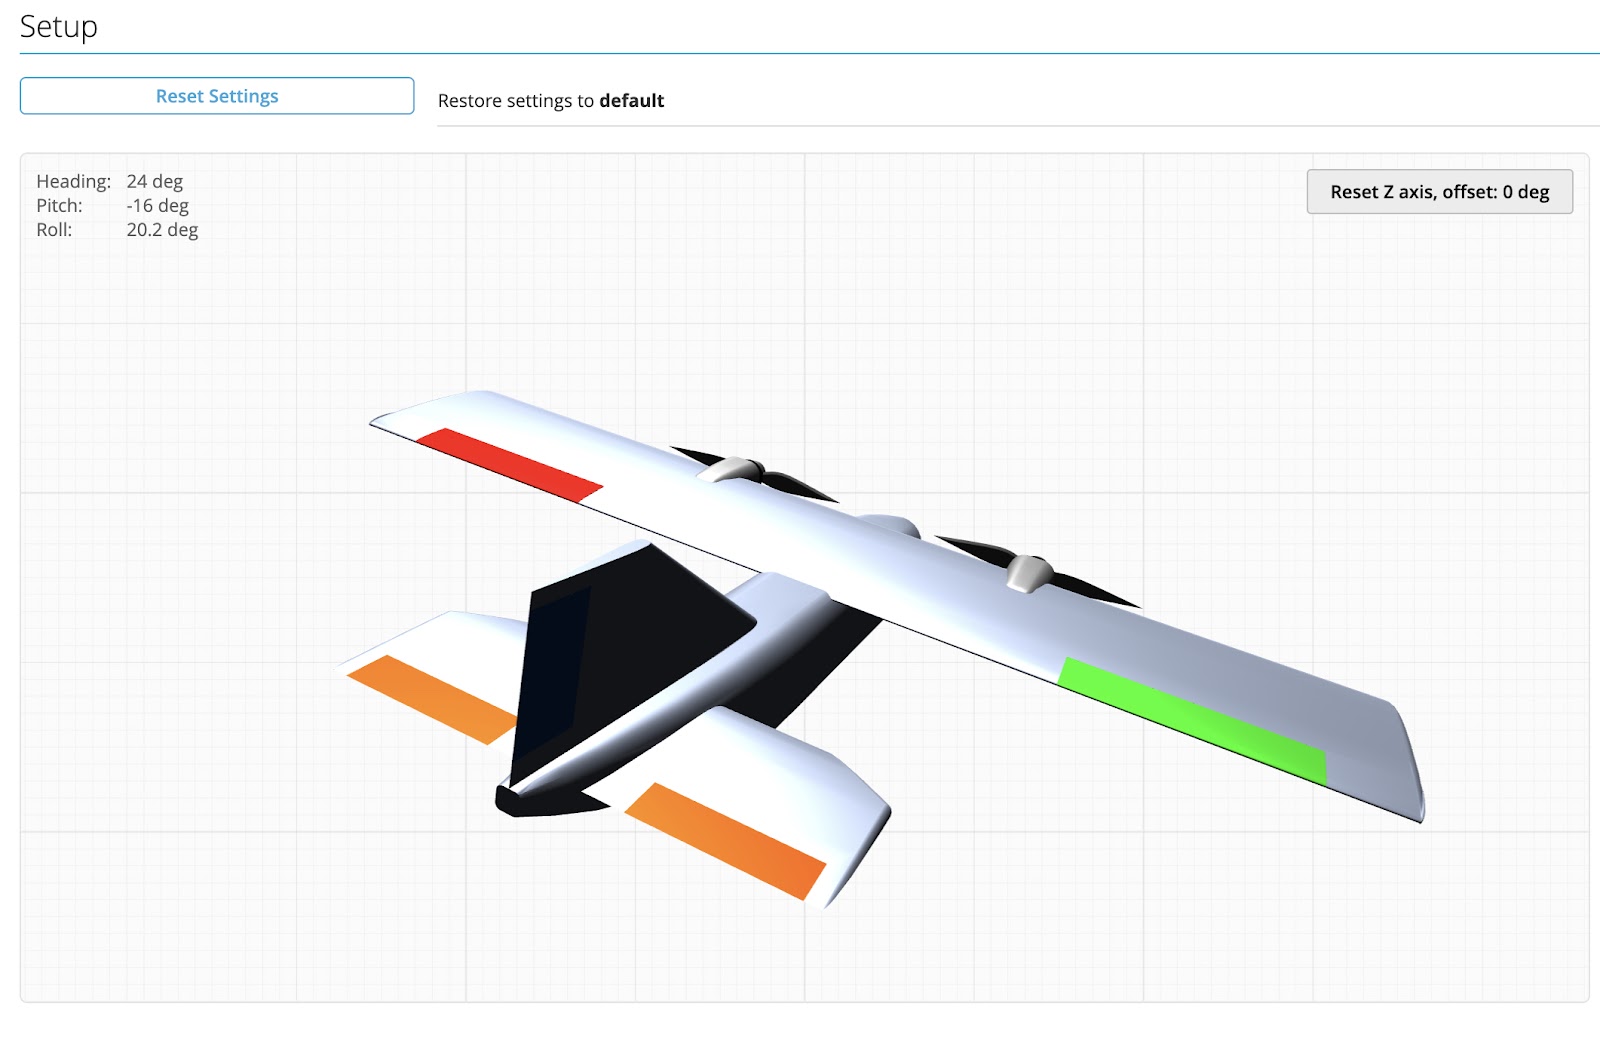
If not, you will need to use the Alignment tool to tell INAV how you have mounted the board.
Check the little arrow on the board to determine which is front.
2. Radio setup
You must use the INAV MIX in your radio.
Do not use an Elevon or V-Tail mix in the radio even if your plane would normally required it. All mixing is done by the flight control board and INAV.
There must be no reduced rates, no expo and no trims. Just 100% stick inputs for the first 4 channels.
The selection of plane-type, mixing, rates and expo are set up in INAV, not the radio.
GOLDEN RULE - Don't edit or reuse an existing model setup for INAV. Make a fresh blank model in your radio to ensure there are no leftover mixes, trims, logical switches or overrides.
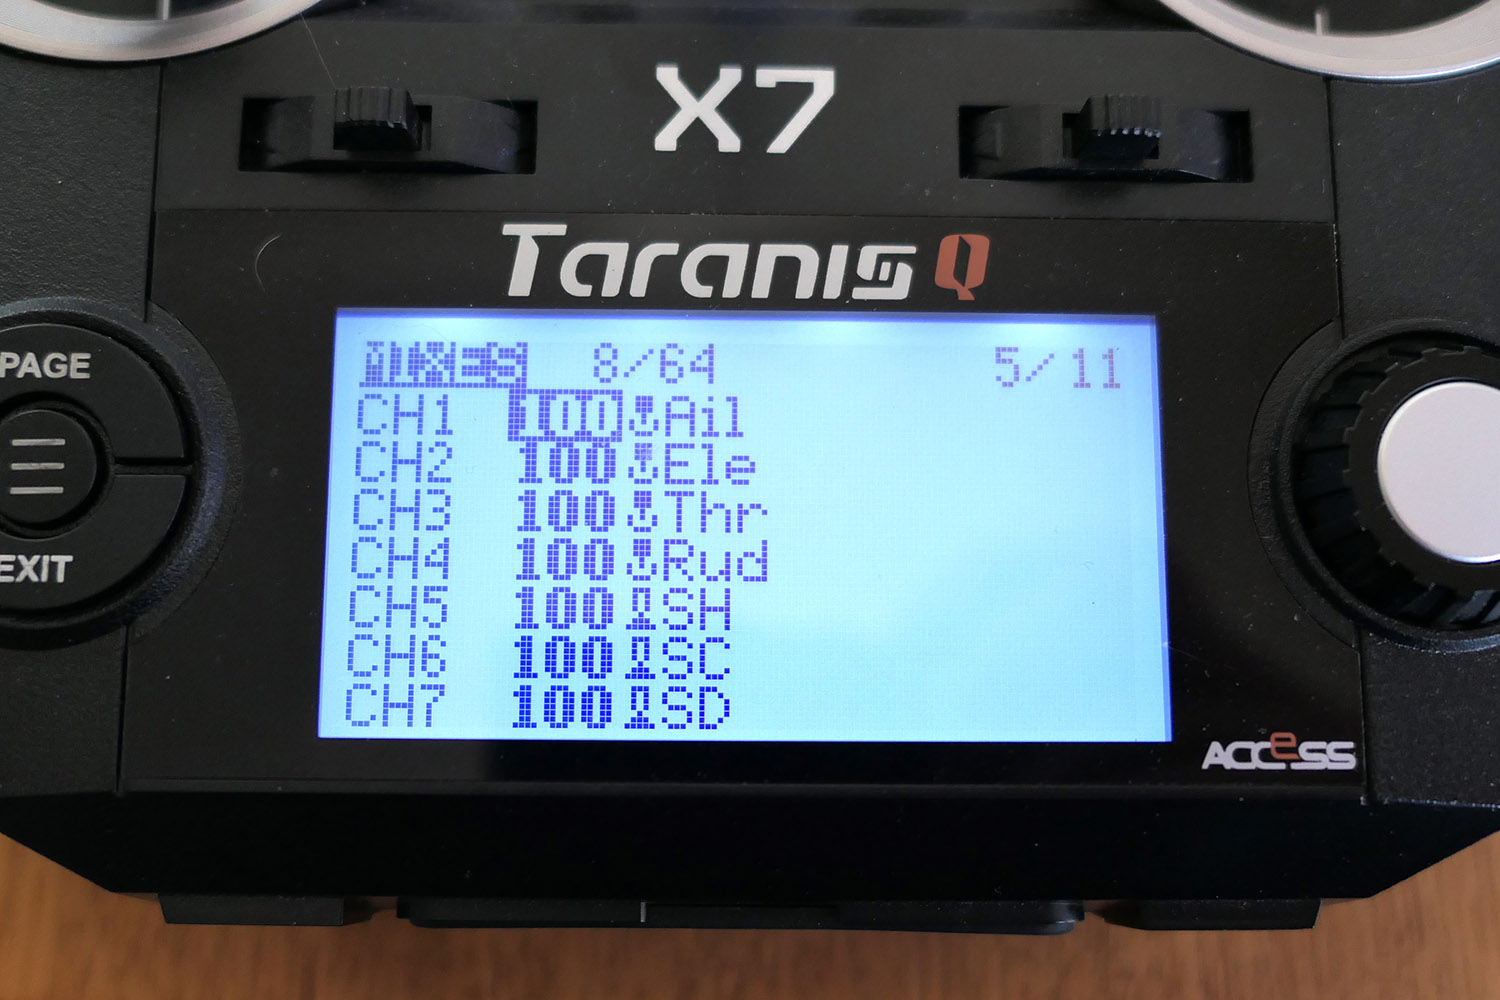
Configure your radio mix like this -
Ch1 - 100% Aileron
Ch2 - 100% Elevator
Ch3 - 100% Throttle
Ch4 - 100% Rudder
Ch5 - usually Arming switch (mandatory for ELRS)
Ch6 Ch7 Ch8 Ch9 etc - Mode switches

If a channel bar moves the wrong way you have an inverted channel in your radio. Go back to your radio and edit your model setup to un-invert the offending channel. This may happen if you have reused a previous model setup.
Note that the Roll Pitch Yaw Throttle bars are not in the same order as their channels. Not sure why the devs chose to display them this way. As long as the stick inputs give the correct response, all is good.
You may need to adjust the Channel end points for 1 2 3 and 4 in the radio so that the AERT channel bars go from 1000 to 2000 in INAV.
Make sure the throttle can go right down to 1000msec (which equals zero throttle %) Some trimming in the radio may be required.
3. Receiver connection
If the channel bars don't move at all when you move the sticks:
Check receiver is actually bound correctly to the INAV model in your transmitter. Look for signal bars on your radio. With ELRS look for "C" in the top right of the ELRS Lua page. Check you have the correct receiver and FC firmware. Reflash if unsure.
Not all boards provide power to the receiver via the USB plug. Some need a battery connected to the FC.
Check your receiver is actually producing a serial signal like SBUS, iBUS or CRSF. Some receivers need to be switched from PWM to Serial output.
Check the receiver is plugged in to the correct UART on the board. Make sure that UART is set to Serial RX in the Ports page. Check that only one UART is set to Serial RX.
F405 boards have a dedicated SBUS pin, which is connected to the R pin on UART2 via a signal inverter. With other boards, like F765 and H743, SBUS receivers can connect to any spare UART.
ELRS receivers can connect to any spare UART.
Check the correct Serial Receiver Provider is selected in the Receiver page:
CRSF for ELRS and Crossfire (Connect R and T to T and R pins of the Serial RX UART)
SBUS for FrSKY (Connect signal wire to R pin of the Serial RX UART, or SBUS pin on F405 boards)
IBUS for FlySKY(Connect signal wire to R pin of the Serial RX UART)
SRXL2 for Spektrum (Connect signal wire to T pin of the Serial RX UART)
Check for solder bridges on the FC and broken receiver cables.

A. Stick movements
If a control surface moves in the wrong direction when you move the sticks -
For control surfaces on a normal plane you can invert the channel in the Outputs page
For control surfaces with mixed inputs, like Elevons or V-Tails, reverse the Weight in the INAV Mixer page for the offending control surface mixer line. For example - If the left elevator on this V-Tail is going down instead of up, change the Stabilised Pitch weight from 50 to -50 for S3
If you need to adjust the throws, change the weight in the INAV mixer or Outputs page.
B. Stabilisation
Switch to Angle mode. Roll and pitch the plane in your hands without touching the sticks.
The control surfaces should move to counteract your rotations.
If the control surfaces move the wrong way, re-check your flight control board orientation, as in section 1 above. Re-check the movement of the channel bars in the receiver page, as in section 2 above.
5. GPS

Check the GPS is connected to the correct UART.
Look in the Ports page for the UART with GPS selected.

Connect the GPS to the recommended GPS UART (or any spare UART) and select GPS as the sensor on that UART in the PORTS page
Normal UART connection - G to G, V to 5V, RX to TX, TX to RX
Compass connection is not required for fixed wing INAV. GPS can provide all the required heading data. A poorly calibrated compass will cause problems.
Check the GPS has power. Some boards can power the GPS through the USB, others may require the battery to be connected

Now it's just a matter of placing the GPS with a clear view of the sky and antenna facing up, and waiting for satellites to be acquired. This can take from a few minutes to over 10 minutes if this is the first connection.
6. Connections
If you are still having problems it's time to go over your connection again.

Check your receiver, ESC, GPS and servos are plugged in where they are meant to be and the right way around. Look at the wiring diagrams on the product page.
Things that often catch me out are -
SBUS-Out from the FrSKY X8R and X6R receivers are in different places.
Changing from SBUS to ELRS on the SpeedyBee F405 Wing, also have to change from UART2 to UART1.
Layout of the pins on the Matek F405 Wing is quite different to many other Matek boards.
Also check for bent pins and solder bridges.
7. Correct firmware target. DFU mode
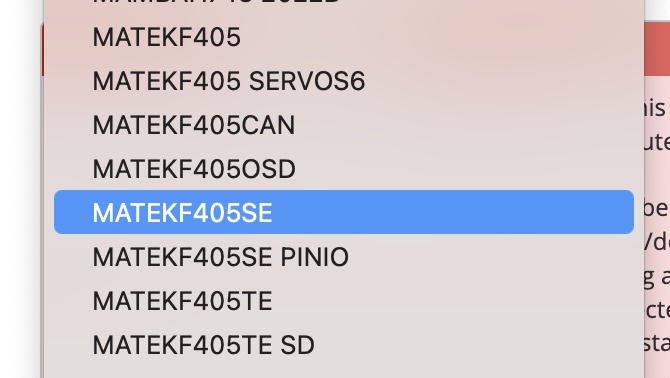
The target name is sometimes not obvious. For example for the Matek F405 Wing firmware target is MatekF405SE.
The SpeedyBee F405 Wing MINI uses the SpeedybeeF405Wing firmware target, not the SpeedybeeF405mini firmware target.
With incorrect firmware, some functions may work OK but some will not.
DFU mode must be enabled on the FC to flash firmware.
Push and hold the DFU button while connecting the USB cable, or type DFU in the CLI while connected.
8. ESC constantly beeping

ESC calibration in INAV
Connect the ESC and motor to the board
2. Move the Master slider to the maximum
3. Connect the flight battery and wait for the ESC calibration beep
4. Slide the slider to the minimum and listen for the ESC calibration-done beeps.
Test the motor spin up by carefully raising the Master slider just a tiny amount

It is safest to leave the servo BEC voltage at 5V for widest compatibility. If you have changed to 6V or 8V on the servo BEC make sure your servos can handle it.
Check that all your servos are functional. One burned out servo will stop all of them working.
11. Board will not connect to the INAV Configurator
Instal the required USB driver on to your PC. See the Configurator front page for Windows PC driver links.
Recent Macs will already have the correct USB driver installed.
GPS may prevent USB connection with some boards. If you are having trouble, disconnect the GPS and try again.
Some programs running in the background may also prevent USB connection. CURA is the culprit on my Mac.
No comments:
Post a Comment